
Tuesday, April 30, 2019
*Black White and Red All Over*
I really love the look of black, white and red together... and I wanted to play with an idea I had in my head to use red as just a quick punch of colour. For this card I used VersaFine black ink and a stamp set by AlteNew. I did a thicker black mat with my Perfect Layers Tools and put it on a white card. I cut out the word Happy using red Stampin' Up! cardstock and a die by Simon Says stamp.

Sunday, April 28, 2019
*Spatter Rainbow Hello*
Another quick and easy card for you today. I inked up this stamp from My Favorite Things using different colours of Catherine Pooler inks along the left side of a white panel. I cut out the MFT "hello" in a blue colour and did a mat with a purple colour of cardstock with my Perfect Layers Tools and added it all to a top folding white card.


Friday, April 26, 2019
*Wonderful Color Bursts*
Happy Friday Everyone! I am over on the Scrap 'n Stamp Canada blog today, showcasing a great stamp set and die from Concord & 9th as well as the Ken Oliver Color Bursts!
I bought the Color Bursts quite a while ago, played with them once and then tucked them away in a drawer. I found myself with some time on the Easter Weekend while the husband and one kid watched Game of Thrones so got out some watercolour paper and the powders and started playing.
 I started out by covering my watercolour paper with some anti static powder and placing it in my stamp positioning tool. I then stamped the big stamp from the Concord & 9th Wonderful Florals set in Versamark ink 3 times to ensure I had good coverage and then I embossed it with white embossing powder.
 I pulled out my non-stick craft mat to protect my surface and used a red, blue and yellow Color Burst and "salted" the colours all over the stamped piece. I then used a fine mist sprayer and spritzed water all over the watercolour paper, watching the colours bloom and grow. It's truly an amazing sight to see!


Once I had good water coverage, I dabbed off the excess with a paper towel. I then set the panel aside to dry and made a few more using different colours. I was looking at the panels and the clean and simple part of me felt that the use of colour was way too overwhelming so I used the Concord & 9th matching die to cut out the image.

 For the one card, I used the Wonderful word die to cut out some black letters to layer on top of the watercolour panel and added some Nuvo Shimmer Pen to create some shine. For the other I stamped the word "friend" from the same Concord & 9th stamp set on kraft cardstock and embossed it with white embossing powder before creating a flag-ended tag that I put on top with foam dots. I also added some white dots and splotches to the kraft card to create a little more visual interest.


This is just one way to use these fabulous pigment powders... I encourage you to try them for yourself!
I bought the Color Bursts quite a while ago, played with them once and then tucked them away in a drawer. I found myself with some time on the Easter Weekend while the husband and one kid watched Game of Thrones so got out some watercolour paper and the powders and started playing.


This is just one way to use these fabulous pigment powders... I encourage you to try them for yourself!
Wednesday, April 24, 2019
*I Don't Love It*
I'm here to tell you that you don't have to love everything you create... believe me, I know this without a doubt. I created this card at a crop a few weeks ago and while I didn't like it, several people commented on it as they passed by. Either they were being nice, or it's just not my cup of tea but it was theirs!
 I used my Life Changing Blending Brushes with Catherine Pooler ink to create the purple strip and set it aside to dry. Once it was dry, I put it through my Big Shot with a geometric embossing folder and then adhered it to a white card. I cut out the word happy using a die by Avery Elle using a dark purple cardstock. I stamped the word "birthday" from a Hero Arts set using purple ink on white cardstock and I cut it out with a die from Lawn Fawn. I put the white flag on the card using foam dots.

Monday, April 22, 2019
*Sparkly Celebrate*
Back when I did my blog post for Scrap 'n Stamp Canada using the Pearl Alcohol Inks, I created an extra piece to use up the ink that I had on the felt pads... and it saw there for a few weeks before I decided I wanted to play with it.
I got this new Carta Bella Starburst stencil and decided to use some of the Moonstone Glitter Paste by Nuvo with it over top of the alcohol ink background. I set it aside to dry and cut out the Stampin' Up! celebrate die on silver glitter paper.

Of course I used my Perfect Layers Tool to create a colourful mat before adding it all on to a white card.
Saturday, April 20, 2019
*Colourful Hello*
You have no idea how much I love the Easter weekend. But it's not for the reasons you think... I work at an office that is open Tuesday thru Saturday and while we get all Stat holidays off (Christmas, New Years etc), many of the Canadian Stat holidays land on Mondays to create long weekends for people. But since we're always closed on Mondays, we are never guaranteed a long weekend unless things like Christmas and Canada Day land on a Monday.
Except for Easter.
Easter is the only guaranteed long weekend we take... and we are off on Good Friday and closed on the Saturday of the weekend as well.
Easter is the only guaranteed long weekend we take... and we are off on Good Friday and closed on the Saturday of the weekend as well.
Don't get me wrong... I truly do LOVE my job.... but WOW it's awesome to have a long weekend!!
We are hosting dinner tonight for family and then we will take it easy until the work week starts again on Tuesday.
I created this card using a Catherine Pooler stamp and my Stamparatus. I loved the idea of different colours on that dotted chevron stamp. I won't tell you how many times I screwed up though LOL! I used Catherine Pooler inks, Stampin' Up! coloured cardstock and a die by My Favorite Things. I added a few clear gems and used my Perfect Layers Tool to create the coloured mat.


Thursday, April 18, 2019
*Furry Friend*
A very good friend of mine and her family adopted a puppy, their first, at the end of March.... and I thought it deserved a congratulations card!
 I didn't have any one sentiment that fit, so I threw together a few. I used one from Stampin' Up!, one from an unknown source (bought it at the sale I went to in Toronto last fall) and the word on from an MFT set. I stamped the Picket Fence Studios image in Versafine and embossed it in white on kraft cardstock. I coloured the one doggo with brown Copics and the result is very subtle. I added a bright green layer before adding it to a white card.

Tuesday, April 16, 2019
*Make A Big Wish*
Not much to say on this one... some Stampin' Up! patterned paper, a bunch of layers and a quick sentiment on the front. I'm not sure how I feel about it....


Sunday, April 14, 2019
*Fill Your Tummy*
I got this cute Hero Arts stamp set recently and felt like playing with it. It's one of those ones that has stamps and dies in the same package. This little monster was just so cute!
 I paired the image with some Stampin' Up! patterned paper on a white card. I added a bit of punch to the top layer by adding a black mat so it stands out on the patterned paper.

Friday, April 12, 2019
*Happily Ever After*
April Fools Day brought us a surprise... that wasn't a joke! Apparently my niece, who had been engaged for a while and we all thought she was planning a September 2019 wedding, got married in September 2018! And she and her hubby and the few people who were in attendance at the wedding, kept it a secret for 6 months. It was so hard to know if it was an April Fools Joke or not.... and it wasn't!
 So I decided to make them a congratulatory card using the AAA Cards Challenge.... the challenge was to do a card in minutes and an added bonus was to use dry embossing. I used this same layout a few weeks ago for a Christmas Card Challenge and when I saw this AAA Challenge, I knew what I wanted to do. The lower layer of white is dry embossed with a floral embossing folder. I added a thin layer of blue glitter cardstock at the end of the top panel and stamped an MFT sentiment along the diagonal. I added a few light blue pearls to finish it off.
And it took me less than 8 minutes to get it all done, including gathering supplies!

And it took me less than 8 minutes to get it all done, including gathering supplies!
Wednesday, April 10, 2019
*A Repeat*
I was looking for inspiration the other day and came across a card on my Pinterest that I liked... so I grabbed some supplies and made this card....
 And when I looked at it again to photograph it, I thought to myself "you've made one like this before". I'm pretty sure the other was in shades of blues or something, maybe a different die, but pretty much the same card.
But what the heck... it's a great easy design to use up a little patterned paper from my stash.

But what the heck... it's a great easy design to use up a little patterned paper from my stash.
Monday, April 08, 2019
*Wonderful*
I'm on the Scrap 'n Stamp Canada blog today with a fun card using the new Alcohol Pearl inks by Tim Holtz. I had fun playing with the set of three I purchased and I LOVE the shimmer that is left behind after these inks dry. If only I could pick it up in a photo.... I wanted to make the alcohol ink background the real star of the card so I did my best to keep it simple.
 To create the alcohol ink background, I taped three alcohol ink felt refill pads to my Tim Holtz ruler. I then added drops of each of the colours from Kit 2 to each of the felt pads and added some Blending Solution to each of the pads.

 I then used the word die from the Concord & 9th Wonderful Florals die set to cut out the letters on both the Yupo paper and out of a piece of black cardstock. I was careful to hold on to the centres of the letters cut from the Yupo paper.
 I added regular scotch tape to the back of the Yupo panel so that the sticky part showed through the letter openings and then added the black letters in to the openings. I added back in the letter centres for the O, R and D that were cut from the colourful paper.


Then, using even pressure, slid the ruler across my Yupo paper several times until I got the blending and the colour saturation I was looking for.


I put the panel on a dark grey mat, added it to a white card and added a few pieces of bling to finish it off.
Friday, April 05, 2019
*Background Check Blog Hop*

This month we are focussing on backgrounds, using the Picket Fence Studios Life Changing Blending Brushes. I LOVE these brushes... love that they are quick and easy to clean up and that it's super easy to control how much colour you lay down on your paper.


I hope you'll visit all of my fellow designers on each of the stops along the Blog Hop... and we encourage you to play along and share your creations on the Scrap 'n Stamp Challenge page on Facebook.
Please hop along with us!!!
Wednesday, April 03, 2019
*Happy*
I can't believe we're at the end of March already.... I don't know where the weeks go. The older I get, the faster it all seems to go by!
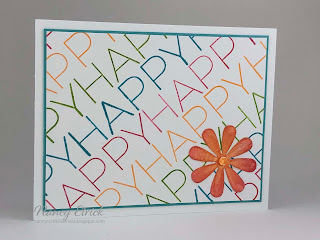 I really like how this card turned out.... I used one the stamps from the Avery Elle Happy Happy Happy stamp set with a few colours of Catherine Pooler inks. I stamped it on a diagonal on the front of a white panel. I found it super easy to line it up and managed to do it without my stamp positioning tool. I added a blue layer with (you guessed it) my Perfect Layers Tool before putting it on a white card. I coloured a piece of white cardstock with Catherine Pooler inks and my Life Changing Blender brushes and cut out a flower from an MFT set. I added some Wink of Stella on top for some shimmer and added it to the card front, adding a clear gem to the flower centre.

Monday, April 01, 2019
*Birthday Splotches*
I love these stamps in the Distressed Patterns stamp set by My Favorite Things. They are so very versatile. They can be the focal point if you use bold colours or you could make them blend in to the background instead.
 I think this is a great girlie card... maybe for a teen? I used Catherine Pooler inks, the MFT stamps plus a sentiment from a set by Gerda Steiner. I added a pink layer using my Perfect Layers Tool and then a few clear gems for dimension.

Subscribe to:
Comments (Atom)