Pages

Showing posts with label Cuttlebug. Show all posts

Saturday, November 11, 2023

*Less is More #296*

It's time for an anything goes challenge with the team at Less is More.  This is a wonderful theme as we see so many different ideas from the creatives that play along with us!


I'm in full-on Christmas card mode, so of course, I made a Christmas card!  I saw a card on Pinterest that had embossed vellum to look like snow, so I decided to play with the idea myself.  

Card Info
*Cardstock:  Stampin' Up! Handsome Hunter, Crumb Cake;  Spellbinders gold foil; unknown vellum
*Images:  The Ton Easy Expressions Holiday
*Ink:  Versamark
*Embossing Folder:  Cuttlebug Swiss Dots
*Dies:  Waffle Flower Circles; Penny Black Reindeer Leaps; The Ton Easy Expressions Holiday
*Etc:  Stampin' Up! gold embossing powder; foam adhesive
*Challenge:  Less is More #296


Saturday, January 01, 2022

*Happy 2022!*

Welcome to another year of craftiness with me, here on my blog!  I have some cards from 2021 still to share with you that will be interspersed with some new creations in the next few weeks.  I made a total of 306 different designs in 2021 (down from my all-time high of 327 card designs in 2020).  I wonder what 2022 will bring?

I have been card making for a very long time... my first project was Christmas gift tags in the winter of 1996 and my first big project was my youngest sons birth announcements early in 1997.  He will be 25 this year!  I have done a few different crafts in my life but card making is the one that has stuck with me the longest.  I have made some wonderful friends through my cardmaking over the years... and I love having a creative outlet that I can share with others.

A friend had me make some different cards for her while I was in the midst of my Christmas card making... I took a few days of a break from Christmas cards to create what she needed, including this 25th anniversary card.

Items Used
*Cardstock:  Stampin' Up! Basic Black; silver glitter
*Dies:  MFT Impact Alphabet, Mod Link 2
*Etc:  Cuttlebug Swiss Dots embossing Folder
*Tools:  Perfect Layers


Friday, October 29, 2021

*Candy Cane Stripes*

I just LOVE this flocked candy cane striped paper from Stampin' Up... so much so that I only had one sheet in the used package I bought and I've been avoiding cutting it up.  Silly, I know.  It was hard for me to put a blade to it, but I think this card was a good reason to do so...

Items Used
*Cardstock:  Stampin' Up! Poppy Parade, Creative Expressions brushed silver
*Paper:  Stampin' Up! Santa's Workshop
*Images:  Taylored Expressions Simple Strips Christmas; Stampin' Up! Candy Cane Season
*Ink:  Versafine Clair Nocturne; Catherine Pooler Rockin' Red
*Dies:  Taylored Expressions Simple Strips, Simple Strips Backer; Waffle Flower Additional Circles
*Tools: Stampin' Up! candy cane punch; Cuttlebug Snowflakes embossing folder
*Etc:  foam adhesive


Monday, October 25, 2021

*Embossed Background*

A while back on a Facebook Group I'm on, I saw someone who was stamping and then using an embossing folder and I was amazed at how good it all still looked.  I had never done this because I was concerned that the words would look askew after going through with the folder so I was surprised when I saw that this person was doing it and it looked so good.  

So I immediately took out a card front, stamped on it and then ran it through with a snowflake embossing folder... and WOW!!

Items Used
*Cardstock: unknown glitter
*Images:  MFT Hand-Lettered Christmas
*Ink:  Versafine Clair Nocturne
*Folder:  Cuttlebug Snowflake 
*Etc:  Nuvo Aqua Shimmer Glimmer Gloss
*Tools:  Perfect Layers
*Challenge:  Christmas 24 #40


Sunday, December 11, 2016

*2016 Christmas Cards #31*

I don't remember buying this snowflake and swirl embossing folder... but I am so happy I found it in my stash when I went to play the other!

I had an idea of a card from Pinterest that I wanted to play with so I cut the "merry" out of silver glitter paper.  I then started to figure out how the card would go together and realized that I, the Queen of Snowflakes, did not have a snowflake that was going to work for the design.

I knew I wanted to do silver, white and red so I pulled out a few things, put them back... pulled out a few things again and came up with this card.  I added some clear Wink of Stella pen to the embossed image and a thin line of silver glitter gel pen around the end of the embossed layer.

And you know what?  I really like it!

Tuesday, November 29, 2016

*2016 Christmas Cards #24*

This card came to me one night as I was falling asleep...  I wanted to run down and put it together before I forgot it, but I knew that was crazy (right?  it was crazy, right?).  Thankfully I was able to get to my creative space the next day and it only took a couple of minutes for me to remember this idea....

I used a scrollwork frame Cuttlebug folder to emboss the background on a dark blue shimmer cardstock.  I cut the Memory Box hanging snowflake from white shimmer cardstock and glued it to the framed piece.  I put it all on a white top fold card and finally added a little gem to the centre of the snowflake.

Quick.  Easy.

And for the first time in forever, an idea I had in my head worked when I put it on paper!

Thursday, November 24, 2016

*2016 Christmas Cards #20*

I can't believe we're a month from Christmas Eve!  I have no idea where 2016 went!

We had a big year...  we did major renovations to our house from May to mid-July, we celebrated our 25th wedding anniversary in June and then did a 17 day trip to Europe to take a Viking River Cruise as an anniversary present to each other, we threw a big party to reveal our renovations to friends and family, I took a trip to visit my sister in October....  and POOF, it's almost 2017!

Another quick card for you today... I used a scrap of patterned paper from my days at the Scrapbook Pantry, layered it on a piece of red cardstock (have I told you lately how much I LOVE my Perfect Layers Tools to create even borders on layers??!!??) and put that panel on a white top fold card.  I used the Stampin' Up! tree punch on green cardstock and ran it through my Big Shot with an embossing folder for interest.  I then cut the word believe using the Tim Holtz dies I bought from Scrap'n Stamp out of the same green cardstock and attached it to the card.

I'm trying hard to not be afraid of the white space LOL!

Saturday, November 12, 2016

*2016 Christmas Cards #8*

I combined dry embossing and a die cut on this card...  a great Impression Obsession snowflake on a snowflake embossed background.  I added a black layer under the white and made a conscious decision to to the top thinner than the bottom with my Perfect Layers Tool.  I added some red Stickles to the middle of the snowflake.

I'm not sure how I feel about a red, white and black snowflake card... I see it and I think "santa".


Friday, November 11, 2016

*2016 Christmas Cards #7*

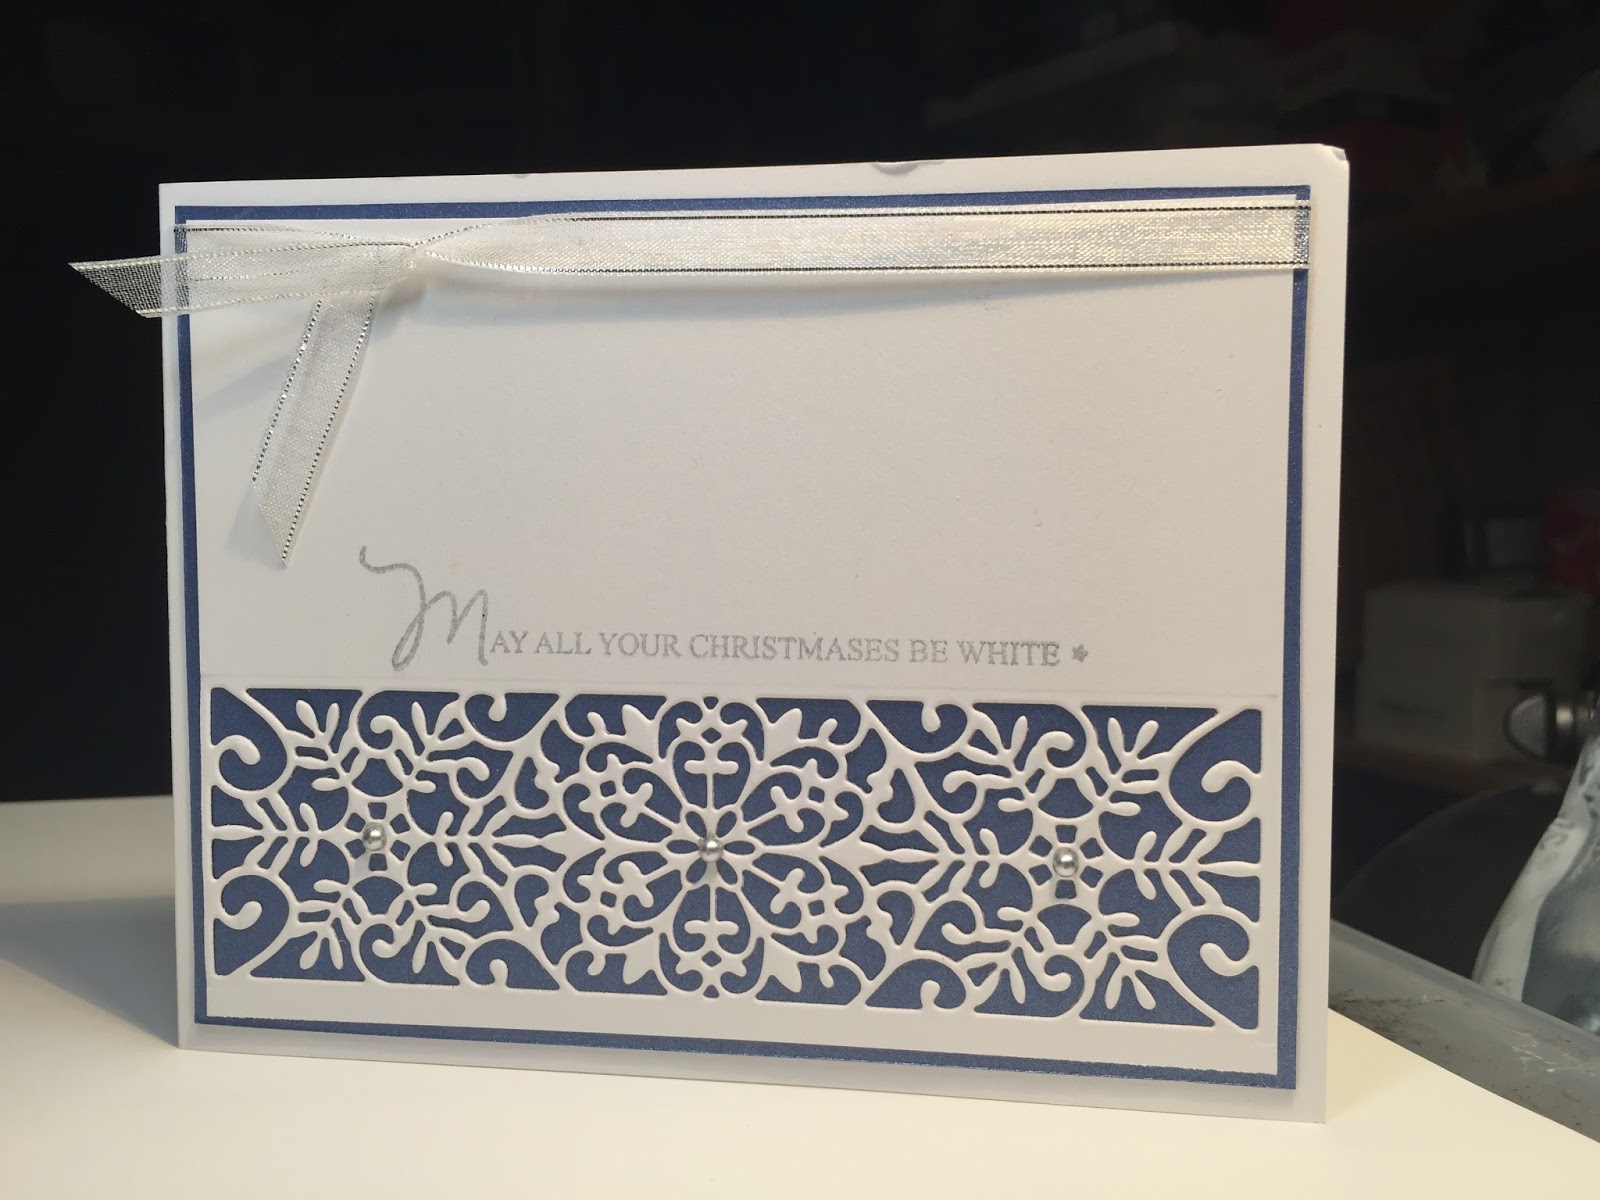
I. Am. In. Love.

I bought this die when I was in Ontario visiting Heather.  We took a trip to Stamp Art in London Ontario and I found this beautiful die.  I don't know what else I want to do with it, but I had to have it...

I used a shimmer white and a shimmer dark blue cardstock on top of a plain white card.  The sentiment was stamped and embossed in silver and I added some little pearls to the centres of the three snowflakes.


Thursday, November 10, 2016

*2016 Christmas Cards #6*

I love sparkle at Christmas time....  It's just so pretty!

This was a pretty easy card to throw together... I used a great Memory Box border die and layered some blue glitter paper under it.  I stamped the greeting in blue Encore Metallic ink and embossed over it with blue pearl embossing powder.  That combination of ink and embossing powder is my snowflake go to and has been for a very long time.


Saturday, November 05, 2016

*2016 Christmas Cards #1*

It's November.... and it's time to start sharing Christmas cards again.  I was in Ontario visiting my sister a few weeks ago and spent a weekend starting my Christmas cards during a retreat with a group of wonderful ladies.  This group gets together twice a year and I've been joining them every fall for the last several years.  It's a pain to pack for a 4 hour flight, but it's worth it to spend the weekend laughing and creating with these ladies. 

I have no idea how many Christmas cards I will actually make this year, but I will share whatever I do created.... starting now...

I absolutely love this die from Simon Says Stamp.  What you can't tell with the photo is that this is a shaker card.  I filled it with some silver glitter and clear microbeads.  The die is cut out of a beautiful light blue glitter paper.


Friday, November 04, 2016

*Perfect Pearls*

Another card from months ago...  I decided to play with a technique with Perfect Pearls.  It's been a LONG time since I played with them!  I used an embossing folder on black cardstock and then tried to carefully wipe Versamark ink over the raised areas.  I then dusted the Perfect Pearls over the top.  I used my Perfect Layers Tool to create a small matte of blue and layered it all on to a black card.


Wednesday, November 02, 2016

*Fabulous!*

I created this card back in the spring... I took a photo and never even though to blog it.  Nothing too exciting but I do like how bright the pink is with the black.


Monday, January 25, 2016

*Welcome to 2016*

I am really hoping to get to crafting a bit more than I have in the last several years.  I don't think I will do nearly as many cards as I used to do, but I sure hope to do more than Christmas cards in 2016.

I did buy myself a Silhouette Portrait and once I get that figured out, I hope to be using it in my card making.

I find myself really missing the feel of the paper and the joy that comes with being creative.

When my sister was visiting after Christmas, we did manage to spend a bit of time in my creative space......  so I actually have something to share!
Yes, it's a Christmas card.... but I was *dying* to play with this new die that my sister got me for Christmas from Simon Says Stamp.  I was having a bit of trouble getting it to cut through cardstock so I tried it on a scrap of patterned paper and ended up loving it (Simon Says Stamp has since replaced the die for me).  I layered the snowflake panel on to a white piece of cardstock, then used my Perfect Layers tool to create the red layer.  I added a belly band of Stampin' Up! Gumball Green that I ran through my Big Shot with an embossing folder to add a little texture.

I am now curious to try more of my dies with patterned papers.  This was a patterned paper that I never thought I'd use (thus I sacrificed it when trying to see if I could get the die to work).  But I love how it looks with these snowflakes!

I hope that 2016 is treating you all well so far..... so hard to believe we're in the last week of January already!

Wednesday, December 09, 2015

*Christmas Cards 2015 #33*

And unless I have some spare time, this is my last Christmas card for 2015....  I just love love love stamping for Christmas!


I really like how this card turned out....  a Cuttlebug embossing folder, a scrap of patterned paper, Labels 8 by Spellbinders, some glitter paper and two Impression Obsession snowflakes.  I love the look of the two corners rounded.

Thanks to everyone who shares on their blogs and to those who then share those cards on Pinterest.  I'm not sure where I would have been this year when trying to make my cards!

Merry Christmas everyone!!!

Tuesday, December 08, 2015

*Christmas Cards 2015 #32*

So, I was writing up my Christmas cards... and it turns out I was two short!  So I have two more cards to share with you, both inspired by cards I saw on Pinterest.

I'm sorry but the photo doesn't look so great....
An Impression Obsession snowflake with some red glitter paper and white cardstock.  I added some bling bling to the snowflake and the card.

Wednesday, December 02, 2015

*Christmas Cards 2015 #31*

I think this will be the end of my Christmas cards for 2015....  I ended up deciding to do a handful of a few of my favourites from this year to finish off the cards I needed.  I was afraid I'd run out of time if I kept trying to come up with new ideas.

Christmas is most definitely my favourite reason to stamp....  but I'm going to try to create more in 2016.  Fingers crossed I can do it!

This is another card using that Stampin' Up Festival of Trees stamp set and the tree punch... and again with that great patterned paper and the even more wonderful silver glitter paper.  I am ddid my best to use up some scraps instead of throwing them out... I love both of these papers so much!

Friday, November 27, 2015

*Christmas Cards 2015 #26*

This card and the one from a few days ago, started out being the same but reverse for the snowflake.  But then I decided to turn this one on it's side.

Tuesday, November 24, 2015

*Christmas Cards 2015 #23*

More of that wonderful Heidi Swapp glitter paper.  It came in a 8X8 stack from Michaels and was with her Marquee display.  I cut out the snowflake from a Stampin' Up! Sizzix die, put it on an embossed white layer, layered it on the blue glitter paper and then on a white card.  I'm not sure about the sentiment in black, though....

Monday, November 23, 2015

*Christmas Cards 2015 #22*

I started this card while I was in Ontario at the first retreat.... but couldn't finish it as I didn't have any silver embossing powder with me.  Just having this great Memory Box snowflake die cut in the beautiful glitter cardstock had me in love with this card.... unfortunately, the addition of the sentiment killed it a bit for me.  I might have to try another....