I was cleaning up my stamp area the other day, cleaning out some of the nooks and crannies in the storage that sits on my desk. I found a 1/4 sheet of this stamped buffalo plaid using the Concord & 9th stamp and I decided to play around with it.
I cut off a strip of the stamped cardstock and put it on a white layer. I used my Perfect Layers Tool to create a 1/16th border around the white panel and added it to a white card. I added a simple birthday sentiment to the card. I used sketch #321 from CAS(E) This Sketch
Happy Wednesday, everyone! Here we are, at the end of May, and temperatures here in Calgary have been wonderful for about a week now. Things are nice and green, flowers are starting to bloom... I love spring and summer!
I created a card a few days ago for the upcoming Scrap 'n Stamp Blog Hop (happening on June7th) and I used a scrap from that card to create this card.
I started out with stamping the candles and the sentiment from Lawn Fawn on the centre of a side fold white card. I coloured the images simply with my Copics, ensuring I didn't lay down a lot of ink so that it wouldn't soak through the front of my card. I had this inked and stitched frame as a scrap on my desk and I added it to the front of the card. I inked the cardstock with the rainbow of colours of Distress Inks and cut the frame with some MFT stitched rectanges. Honestly, it was going to hit the recycling bin but I am SO happy it was sitting on my desk so that I could use it on this card.
To finish off the card, I added some Crystal Stickles to the candle flames.
I tried something a little different for photographing this card (and will try it for a while. Instead of doing the card standing up, I am trying to do it with the card laying flat inside of my home made light box. Let me know if you have an opinion on this as I'm not sure which is better at this point.
I am playing along with the AAA Cards Challenge #140... up to one third of the card with the bonus challenge of bright colours. I love these Clean and Simple challenges but sometimes fine I don't have the time to play along.
I finally broke out this stamp set I bought a few weeks ago... MFT Color Drops. I inked it up with Lime Rickey, Grape Crush, Samba and All That Jazz inks from Catherine Pooler. I used some Post-It tape to mark off the left third of my card before I started stamping to ensure I had a crisp clean edge. I then cut out the word Congrats, a die by Pretty Pink Posh, using silver glitter paper and I attached it to the front of the card using a fine tip glue by Stampin' Up!
I'm back today with another card using that great Weekend Doodles set from AlteNew. I am SO glad I got this set and the matching dies!
For this card, I placed a piece of white cardstock in my Stamparatus and set up the stamp on the door. I then stamped the image four times using Samba, Lime Rickey, Fiesta Blue and Tiki Torch Catherine Pooler inks to create the rainbow effect on the image. I overlapped the colours a little bit to create some blending. I then cut it out with the matching die. I coloured a piece of white cardstock with Samba ink and once dry, used the MFT RicRak die to cut out the element along the right side of the card. I put everything down with Lawn Fawn liquid glue and stamped the sentiment with Midnight Catherine Pooler ink. I added a couple of clear gems around the wreath for a little dimension.
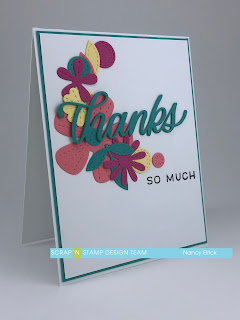
At the beginning of May, we had a Floral Frenzy blog hop on the Scrap'n Stamp blog.... and I had a lot of the die cuts from the card I created left over. So I decided to make all three of my cards for the blog using those leftovers. You can see here just how many flowers I had left from the My Favorite Things Stiched Blooms I cut earlier in the month...
I had this card almost totally put together when a friend asked if she could get a thank you card from me... so I finished it off as a thank you card.
I started out with the smaller white panel and I drew a circle in the top 1/3 of the card using a pencil so that I could work with the circle shape.
I then started playing with the flowers I had left over... layering them over and under, tucking pieces, but trying to keep along that circle shape I had drawn.
Once I had the look I wanted, I grabbed that trusty Press n Seal and laid it over top of my flowers with the sticky side against the flowers. Once I had them all stuck to the Press n Seal, I flipped it over and put glue on to all of the pieces. I then turned it over and placed the pieces back on to my card front as a grouping, rubbing them down to get the glue to stick well. I let it sit for a few minutes before I carefully peeled off the Press n Seal. I then added a little glue to the very front pieces that didn't have anything sticking them to the layer behind them.
I took time to carefully erase the pencil marks and added the green mat behind the white layer before adding it all to the white card.
And there it sat until the friend asked for a Thank You card. I cut out the word "thanks" three times and glued each of the pieces together with a fine tip liquid glue before sticking it to the front of the card. I masked off part of a stamp from the Lawn Fawn Simply Sentiments set and stamped it on the card using black VersaFine Claire ink.
I created a second Alcohol Pearl background the other day and honestly, I didn't really like it. The colours muddled together a little too much and it just wasn't right. I kept looking at it, hating that I could be wasting the Yupo Paper because of it.
I wanted to throw it out.... but I didn't.
And one day, right before I was going to throw it out, I decided to try stamping on the background. I wasn't sure how the Yupo would take the Memento ink... but it did just fine. It did take a while to dry so I set it aside for a while before I used the die to cut out the AlteNew Weekend Doodles wreath.
And once it was cut out, I really liked what I had created! Once again I used that stamp from the MFT Distressed Patterned set and some Twilight Catherine Pooler ink to create a background for the wreath. I was careful to mask off the inside of the wreath as I knew I wanted to place my sentiment there. I stamped the sentiment in Midnight Catherine Pooler ink, added a bright blue layer and put it all on to a white card.
I can't believe we are already at the long weekend here in Canada! We've had a real mix of weather in Calgary in the last few weeks... a huge snowstorm, some rain, a couple of really hot and sunny days and lots of things in between!
I was craving spring/summer colours when I put this card together. I had a vision as soon as I saw the new RicRac die from My Favorite Things and I was so excited when I finally had it in my hands! I was a little disappointed that the cut pieces don't nest to each other, but I still like how it all turned out.
I cut the die using four different colours of cardstock and used some liquid glue (Lawn Fawn) to adhere the pieces to a front panel of white cardstock. I added a black mat using my Perfect Layers Tool and put it all on to a top folding white card. I added MFT Cheers die cut to the front and some clear gems to finish it off.
I went a little nuts for the latest AlteNew release and ended up with two stamp sets and their dies. At least I saved on shipping since I ordered it locally LOL!
I pulled out the Weekend Doodles set first, stamped up the larger floral image and coloured it with some Copics before using the die to cut it out. Once it was cut out, I needed to figured out what I wanted to do with it. I used one of the MFT Distressed Patterns stamps and my Twilight Catherine Pooler ink and created a spatter background for behind the image. I put the flowers on the card and then added the sentiment stamped in the black VersaFine Claire ink.
I have seen so many creators playing with Alcohol inks lately... and I am SO very envious of the work they are doing. I bought Alcohol inks probably 12-15 years ago, played with them a bit, then tucked them away. I pulled out some of my old colours and while they work just fine, I'm not in love with the colours... so I went out and bought 2 sets of the new Alcohol Pearls. I also went to my local camera store to buy one of the air blowers everyone seems to be using instead of the dreaded straw (you get really light headed with a straw!) I created a couple of background the other day and this is the first card I ended up creating
I did a half sheet of the smaller sized Yupo Paper and did one colour at a time with Blending Solution, drying each colour before moving on to the next to avoid getting a brown result. You have to be careful using your heat tool to dry the colours with the Yupo Paper as it isn't really even paper... it's more of a plastic and it will melt with too much heat.
Once it was completely dry, I cut the panel down and used my Perfect Layers Tool to create a black border around the panel before placing it on the front of a side folding card. I used the Simon Says Stamp Big Thanks die to create the sentiment in black cardstock and finished it off with my Nuvo Shimmer Pen.
I'm pleased with how this alcohol ink panel turned out... and I look forward to playing some more!
You know how sometimes you have an idea in your head and it sits there for weeks and weeks and finally you decide to try it... and it sucks?
Well, this is that card for me.
I had an idea to use a sentiment stamp with my Gina K Wreath Builder set. I grabbed a set by Stampendous and some Catherine Pooler ink... and I just couldn't get this card to look right.
But hey, at least I finally tried the idea that's been floating in my head for a very long time
A good friend of mine slipped and fell a few weeks ago after Calgary got hit with a spring snow storm... she managed to break her foot in four places. I thought I'd create a card for her to brighten her day a little bit.
Back at the beginning of the month, the Scrap'n Stamp Design Team participated in a Floral Frenzy Blog Hop, and I had a lot of the flowers I had die cut left over. I mean, a lot. So I decided I'd use those flowers to create the other two cards for my design team posts as well! Make it a sort of series, I suppose.
This card was really simple to do. I had already cut out the flowers from My Favorite Things Stitched Blooms in four different colours of cardstock. I have this set of dies for a very long time but have never cut the pieces apart, so I placed the all together die on a piece of white cardstock that I cut down to 4.75" X 3.5" and cut it out, allowing pieces to overlap. I took out the white pieces and placed regular scotch tape along the back of the white panel so that the sticky part of the tape showed through the front of each of the spaces. I then laid in the coloured die cuts and pushed them down to stick to the scotch tape. When I had them all down, I trimmed off the flower edges.
I then cut a slightly larger panel in the same green I had used for the die cuts and layered the floral panel on top of it before putting it all on to a white card. I then put the piece in to my stamp positioning tool so that I could stamp the sentiment from the My Favorite Things Essential Sentiments stamp set in VersaFine Claire ink in black. I did it in the stamp positioning tool so that I could restamp it a few times to ensure I got even coverage since I was working on a less than smooth surface.
To finish off the card, I added some of the circle elements from the die set to add a little more dimension.
I still have LOTS of those flowers to play with.... I'll be back at the end of the month with another card using these same flowers!
How is it possible that we are a week in to the month of May already? Not that I'm complaining that it's spring and that the warm weather is here and only getting better... but man! Time sure does fly!
There is a new challenge blog that just started up in the last few days... a monthly Birthday Card challenge blog. This is my entry for their first challenge.... check them out at AAA Birthday Card Challenges!
I don't know what it is about a striped black and white border on a card, but I sure do love it! I created this card using paper from My Favorite Things, ink from Catherine Pooler and stamps from Lawn Fawn and Winnie and Walter.
I absolutely LOVE this daisy coverplate die by A Jillian Vance Design but I struggle to find new ways to use it.
I started out thinking I'd just do a white on white card but I found it a little too "white on white" so I used one colour of Copic marker to create the flower centres. Yes, one colour. Just more and more layers to create the depth of colour.
It's hard to believe that we said goodbye to Dad 13 years ago today. I miss him so much. I can picture him so clearly, like I only saw him a day or two ago. The hint of a smile, the twinkle in his eye, the shape of his hands.
This isn't a masculine card, but the sentiment makes me think of my Dad...
I used some Gina K stamps that I honestly don't think I've ever inked before. I coloured them quickly with some Copic markers. I added the sentiment by Hello Bluebird, stamped in light grey ink so that it wouldn't take away from the floral image.
Welcome to the May Floral Frenzy Blog Hop for Scrap'n Stamp Canada and the monthly challenge on the Scrap'n Stamp Challenge Facebook page.... this month, our theme is floral cards! Anyone who visits my blog regularly knows I love flower stamps and dies, so this was an easy one for me! I combined the blog hop with a card a friend asked me to make and this is what I came up with...
I had a lot of fun playing with some colours and the My Favorite Things Stitched Blooms dies. I have kept the set connected together since I got it and just end up cutting out an entire plate of flowers each time... and then I challenge myself to use up all the bits and pieces on different cards. This time I used a teal, light yellow, coral and pink. I piled all the flowers together while I played with the layout for this card. You get a lot of pieces each time you cut this set out!
I decided to use a stitched rectangle to add a little visual interest to my card, so I taped two of the My Favorite Things Stitched rectangles to a piece of white cardstock so that I could cut out a frame. I used the tape to keep the dies in place so that my frame would be even on all sides.
After cutting out this piece, I attached it to the front of a white card with liquid glue. I then got busy trying to decide where I wanted the different floral bits. I placed them down without any adhesive, using my tweezers to help me get things placed how I wanted them.
After I had things set up the way I wanted them, I used a piece of Press and Seal (yup, the stuff you find with the cling wrap and aluminum foil in the grocery store) to pick up the pieces. This stuff is great. One side is a little tacky... just tacky enough to pick up pieces without the pieces being stuck on the Press and Seal forever. The only downside is that there is some static cling that happens when you use this stuff so sometimes pieces can move. I took the piece of Press and Seal with the pieces stuck to it and turned it so that the backs of the floral pieces were facing up so I could add some liquid glue to the backs of the pieces.
I then grabbed the Press and Seal and carefully placed it back over my card and pressed the floral pieces on to the card front. I let it set up for a moment or two before I removed the Press and Seal. I then used a fine tip glue applicator to add some glue to the pieces that didn't get a lot of glue on them and then added some of the centres to a few of the flowers.
To finish off the card, I placed my card in to my stamp positioning tool so that I could be sure to get the perfect placement of my sentiment. I placed my clean clear stamp from Lawn Fawn on the card and picked it up with the lid of the positioning tool. I didn't have enough space to use the entire sentiment so I placed a piece of painters tape over the part of the stamp I wasn't going to use and inked the sentiment with Onyx Black Versafine ink. I removed the painters tape and then stamped my image on the front of the card.
I really do love playing with flowers on my cards... and I look forward to seeing what each of you creates this month as well!
Here are the links to each of the blogs in the Hop... I hope you will go and have a look and leave a comment on each blog to have your chance to win a $50 gift certificate from Scrap'n Stamp!
I had an idea in my head when I bought this Picket Fence Studios stencil. I started out using it with some Catherine Pooler inks in yellows and oranges and my Life Changing Blending Brushes. I washed off the stencil and set the panel aside to dry for a few hours. Once I was sure it was dry, I grabbed the stencil and put it back on top and put on some Nuvo Moonstone Glitter Paste on top and once again set it aside to dry. I used the two thanks dies by Simon Says Stamp to create a shadowed look for the sentiment, put it on the front of the panel and added it all to a white card.
And now let me tell you about what happened this card after I photographed it to put it on my blog. I had a grey ink pad open on my desk. I reached for something and managed to knock this card, face down, in to the open grey ink pad. I have no idea if there will be any way for me to rescue it... I'm just happy it happend *after* I took the photos!

 I cut off a strip of the stamped cardstock and put it on a white layer. I used my Perfect Layers Tool to create a 1/16th border around the white panel and added it to a white card. I added a simple birthday sentiment to the card. I used sketch #321 from CAS(E) This Sketch
 I started out with stamping the candles and the sentiment from Lawn Fawn on the centre of a side fold white card. I coloured the images simply with my Copics, ensuring I didn't lay down a lot of ink so that it wouldn't soak through the front of my card. I had this inked and stitched frame as a scrap on my desk and I added it to the front of the card. I inked the cardstock with the rainbow of colours of Distress Inks and cut the frame with some MFT stitched rectanges. Honestly, it was going to hit the recycling bin but I am SO happy it was sitting on my desk so that I could use it on this card.


 For this card, I placed a piece of white cardstock in my Stamparatus and set up the stamp on the door. I then stamped the image four times using Samba, Lime Rickey, Fiesta Blue and Tiki Torch Catherine Pooler inks to create the rainbow effect on the image. I overlapped the colours a little bit to create some blending. I then cut it out with the matching die. I coloured a piece of white cardstock with Samba ink and once dry, used the MFT RicRak die to cut out the element along the right side of the card. I put everything down with Lawn Fawn liquid glue and stamped the sentiment with Midnight Catherine Pooler ink. I added a couple of clear gems around the wreath for a little dimension.


 I then started playing with the flowers I had left over... layering them over and under, tucking pieces, but trying to keep along that circle shape I had drawn.
 Once I had the look I wanted, I grabbed that trusty Press n Seal and laid it over top of my flowers with the sticky side against the flowers. Once I had them all stuck to the Press n Seal, I flipped it over and put glue on to all of the pieces. I then turned it over and placed the pieces back on to my card front as a grouping, rubbing them down to get the glue to stick well. I let it sit for a few minutes before I carefully peeled off the Press n Seal. I then added a little glue to the very front pieces that didn't have anything sticking them to the layer behind them.


 And once it was cut out, I really liked what I had created! Once again I used that stamp from the MFT Distressed Patterned set and some Twilight Catherine Pooler ink to create a background for the wreath. I was careful to mask off the inside of the wreath as I knew I wanted to place my sentiment there. I stamped the sentiment in Midnight Catherine Pooler ink, added a bright blue layer and put it all on to a white card.

 I cut the die using four different colours of cardstock and used some liquid glue (Lawn Fawn) to adhere the pieces to a front panel of white cardstock. I added a black mat using my Perfect Layers Tool and put it all on to a top folding white card. I added MFT Cheers die cut to the front and some clear gems to finish it off.

 I pulled out the Weekend Doodles set first, stamped up the larger floral image and coloured it with some Copics before using the die to cut it out. Once it was cut out, I needed to figured out what I wanted to do with it. I used one of the MFT Distressed Patterns stamps and my Twilight Catherine Pooler ink and created a spatter background for behind the image. I put the flowers on the card and then added the sentiment stamped in the black VersaFine Claire ink.

 I did a half sheet of the smaller sized Yupo Paper and did one colour at a time with Blending Solution, drying each colour before moving on to the next to avoid getting a brown result. You have to be careful using your heat tool to dry the colours with the Yupo Paper as it isn't really even paper... it's more of a plastic and it will melt with too much heat.


 I don't know what it is about a striped black and white border on a card, but I sure do love it! I created this card using paper from My Favorite Things, ink from Catherine Pooler and stamps from Lawn Fawn and Winnie and Walter.


 I used some Gina K stamps that I honestly don't think I've ever inked before. I coloured them quickly with some Copic markers. I added the sentiment by Hello Bluebird, stamped in light grey ink so that it wouldn't take away from the floral image.


 And now let me tell you about what happened this card after I photographed it to put it on my blog. I had a grey ink pad open on my desk. I reached for something and managed to knock this card, face down, in to the open grey ink pad. I have no idea if there will be any way for me to rescue it... I'm just happy it happend *after* I took the photos!
