Pages

Showing posts with label Birch Press. Show all posts

Saturday, August 01, 2026

*{BYSHC} Sketch #72

 How on earth is it August already??!!!??  Why do the summer months fly by so fast and winter seems to last forever?

Anyway, there's a fabulous new sketch for you to use to get going on your Christmas cards over at Build Your Stash Holiday Cardmakers.


When I saw this sketch, I immediately had this idea ..,. and while it's not exactly the sketch, I think it's pretty darn close.  I LOVE how clean and simple this is!  This die was just absolutely perfect for this sketch!

Card Info
*Cardstock:  Stampin' Up! Basic Black; silver mirror
*Stamps:  Alex Syberia Christmas Wishes
*Ink:  Versafine Clair Nocturne
*Dies:  Birch Press Drifting Snowflake
*Tools:  Perfect Layers


Tuesday, November 25, 2025

*CAS Colours & Sketches #574*

 The current challenge at CAS Colours & Sketches is a sketch... 


I decided to go super clean and simple with my card using this sketch.  I dug out this gorgeous ornament flourish die and cut it out of gold mirror cardstock.  I added a matted layer (because that's just my style) and a simple sentiment.

Card Info
*Cardstock:  Bazzil gold mirror; Stampin' Up! Basic Black
*Stamps:  Paper Trey Ink Signature Christmas
*Ink:  Versafine Clair Nocturne
*Dies:  Birch Press Laskett Ornament
*Tools:  Perfect Layers


Monday, April 15, 2024

*AAA Colourful #3*

 It's time for a new colour challenge at AAA Colourful...  we show you a colourboard and you take inspiration from it to create something beautiful...


I decided to go super clean and simple for my card... and chose to use some alcohol ink to create my splash of colour.  I only wish that my Yupo paper was more of a true white...

Card Info
*Cardstock:  Yupo; Stampin' Up! Basic Black
*Images:  The Ton Easy Expressions
*Ink:  Versafine Clair Nocturne: Alchemy & Tranquil Alcohol Pearls
*Dies:  A Jillian Vance Design Open Daisy; The Ton Easy Expressions; Birch Press Laskett Ornament
*Tools: Perfect Layers
*Embellishments:  Studio Katia Arctic Breeze Pearls
*Challenges:  AAA Colourful #3


Sunday, November 26, 2023

*Red and Gold*

 I had a few minutes and put this card together for the colour challenge at Color Hues.  I don't use it enough, but there is nothing more "Christmas-y" than red and gold together...

Card Info
*Cardstock:  Stampin' Up! Cherry Cobbler; unknown gold sparkle
*Images:  Paper Trey Ink Signature Christmas
*Ink:  Versafine Clair Nocturne
*Dies:  Birch Press Laskett Ornament; Spellbinders Christmas Blooms
*Tools:  Perfect Layers
*Embellishments:  unknown gold gem
*Challenges:  Color Hues #76


Thursday, November 23, 2023

*Time Out Challenges #252*

We are winding down with the challenges at Time Out for 2023... only this challenge and one more before we take a little break going in to the New Year.  Many of us are still working on Christmas cards so we have a winter/holiday challenge for you today.


I saw this Birch Press Santa set of dies and knew I had to have it... it's a little large for my usual clean and simple style, but he's just so handsome!

Card Info
*Cardstock:  Stampin' Up! Real Red, Granny Apple Green, white shimmer
*Paper:  red flocked (unknown)
*Images:  The Ton Easy Expressions Holiday
*Ink:  Versafine Clair Nocturne
*Dies:  Birch Press Adornment Santa; The Ton Easy Expressions Holiday; Pink Fresh Studio Slim Strips
*Etc:  foam adhesive; Frosted Lace Stickles


Sunday, August 20, 2023

*Create It 3-Ways Instagram Hop*

 I participated in an Instagram Hop yesterday and since I didn't have access to my laptop for the last few days, I didn't get to get it posted here to share with my blog followers instead.  

This is a fun hop... once a month, on the 3rd Saturday of the month at 3pm eastern, a group of us share three cards we've created following a theme... the catch is, we must use at least ONE thing the same in all three cards...  a technique, a colour palette, a stamp set etc.  It's a great way to challenge yourself to use the supplies you have.

If you want to see the rest of the hop, head to my Instagram page and find the cards you see in this blog (the post on IG is dated Aug 19, 2023) post... then you can hop to see what everyone else created.

I took the challenge and ran with it, creating three cards using the same colour palette, the same stamp sets, a white on white panel and dry embossing.  I love how all three look the same, but are completely different

My first card was the least clean and simple of all of my designs...  I really love how this one turned out.  On all three cards, to create dimension with the butterflies, I put foam adhesive on the wings and liquid glue along the body and adhered it down to my card front, making sure to let the glue dry before I stopped pressing down the centre

Card Info
*Images:  Pink Fresh Studio Small Butterflies; The Ton Easy Expressions
*Ink:  Catherine Pooler Tranquil, Stone Blue, Cove Blue; Versafine Clair Nocturne
*Dies:  Pink Fresh Studio Small Butterflies; The Ton Easy Expressions
*Embossing Folder:  unknown (the info I had for it is incorrect)
*Etc:  Foam Adhesive

After my first card is when I decided to try to incorporate dry embossing in all three cards as well...  For this one, I used a folder, but only on a portion of my card.

Card Info
*Images:  Pink Fresh Studio Small Butterflies; The Ton Easy Expressions
*Ink:  Catherine Pooler Tranquil, Stone Blue, Cove Blue; Versafine Clair Nocturne
*Dies:  Pink Fresh Studio Small Butterflies; The Ton Easy Expressions
*Embossing Folder:  Darice Hennah

My last card, I had a vision in my head.  I wanted it to be super clean and simple.  I wanted a flourish.  I searched through all of my dies and the only flourish I had was one with an ornament on it.  I thought about cutting the die cut apart.... but then realized I could just cover the snowflake with the right sized butterfly!

Card Info
*Images:  Pink Fresh Studio Small Butterflies; The Ton Easy Expressions
*Ink:  Catherine Pooler Tranquil, Stone Blue, Cove Blue; Versafine Clair Nocturne
*Dies:  Birch Press Laskett Ornament; Pink Fresh Studio Small Butterflies; The Ton Easy Expressions
*Tools:  Scor Pal
*Etc:  Foam Adhesive

I hope you liked these cards as much as I do...  I am truly thrilled with this trio!


Sunday, October 23, 2022

*CAS on Friday #242*

 Our beautiful fall is over... or at least on pause.... we good a good dump of snow from Friday night into Saturday afternoon and it's a winter wonderland outside.  It's not too cold (right around freezing) so it's melting slowly and hopefully will be gone in a few days.  It looks pretty but I never look forward to our cold and snowy months.

I spent some time in my craft room earlier today and created this card for the current CAS on Friday Challenge....  the challenge is to use only black and white and one other colour.  It's hard to tell from my photo but I chose gold mirror cardstock to go with my black and white.

Card Info
*Cardstock:  Stampin' Up! Basic Black; unknown gold mirror
*Images:  Simon Says Stamp Clean Line Christmas
*Ink:  Versafine Clair Nocturne
*Dies:  Birch Press Glitz Snowflake; MFT Stitched Rectangles


Wednesday, March 23, 2022

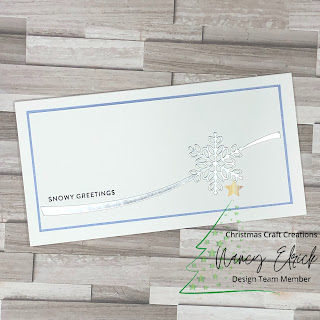
*March Christmas Craft Creations*

It's the end of March which means it's time for my monthly design team commitment with Christmas Craft Creations.  While it's fun to play with my Christmas stash a little bit all year long, it still feels a little strange for me simply because in 25 years of creating, Christmas cards have all been created in the fall and early winter.  I really need to play with that stash more often!


The theme for this month is a slimline card... and I really love these mini slimline cards.  It was the absolute perfect size for this gorgeous snowflake die I have had for a few years.

Card Info:
*Cardstock:  blue Stardream; unknown brushed silver foil
*Images:  Simon Says Stamps Warmest Wishes
*Ink:  Versafine Clair Nocturne
*Dies:  Birch Press Drifting Snowflake
*Tools:  Perfect Layers
*Challenges:  Christmas Craft Creations

I hope you'll play along with us this month!  Share your creations with us before April 12th for your chance to WIN a great prize!  Just share your slimline Christmas creations HERE!

Wednesday, December 08, 2021

*Silver Sparkle Snowflake*

This is another card where I've used one snowflake to create a pair of cards.  I love the size of this Birch Press snowflake, but for a clean and simple gal, it's a bit big on a card front... so instead, I cut it in half and made two cards!

Items Used
*Cardstock:  Stampin' Up! Basic Black
*Images:  Simon Says Stamp Good Cheer
*Ink:  Versafine Clair Nocturne
*Dies:  Birch Press Glitz Snowflake
*Tools:  Perfect Layers


Sunday, December 27, 2020

*Blue*

I'm on the Scrap 'n Stamp Canada blog today with a card using the Random Act of Cardness prompt of Blue.  I had fun playing with different shades of blue to create this beautiful ornament!  I LOVE the Birch Press layering dies and had to buy three different Christmas ornament ones this year.  For this card I used some blue shimmer cardstock from my stash as well as some silver glitter paper, along with part of a sentiment from a stamp set from Gina K and the Belle Ornament.  I stamped the word JOY with Versamark ink and embossed it with white embossing powder.  I had fun playing with the different layers, deciding how it should all go together... which colours where.


Thursday, December 24, 2020

*Ornamental Joy*

 And here it is... Christmas Eve.  I'm working a half day today, sporting my ugly Christmas sweater with the rest of the staff at the Chiro clinic I work at.  After today we all get a few days off which I think everyone is looking forward to.  

Tonight our little family of four will be eating our big turkey dinner.  We did this for the first time last year... we changed up Christmas not knowing how I'd feel a week after my 2nd round of chemo and we liked it so much we're copying it this year.  Of course, we would love to have some extended family and some friends over to celebrate the holidays, but this is the year to keep it small.  I am thankful my grown sons still live at home so that we don't have to have Christmas without them.  I am hopeful that Christmas 2021 will look a little more like Christmas past.

I know it's not how many of us expected to see Christmas this year, but I do hope that each of you makes the best of what is...  it's important for us all to do our part to stay healthy.  I think maybe it will make all of us appreciate what we normally have, just a little more.

I hope you all have a very Merry Christmas... cherish those you have around you, enjoy the time spent virtually with family and friends...

Items Used:
*Cardstock:  Neenah Classic Crest Cover Solar White 110lb; silver mirror
*Patterned Paper:  Brutus Monroe Candy Stripe
*Dies:  Birch Press Ornament Basics; Stampin' Up! Joy; My Favorite Things Stitched Rectangles
*Embellishments:  Honey Bee Prism Gems


Saturday, November 28, 2020

*Christmas Buable*

I fell in love with the Birch Press ornament dies that came out this year...  I ended up buying the basic set plus two other decorative sets....  I need more time in a day to play!  Although I can't complain as I am on track to have all of my Christmas cards individual designs this year... for the first time ever!  I sure hope I can pull it off!

Items Used:
*Cardstock:  Neenah Classic Crest Cover Solar White 110lb; silver and light blue glitter
*Images:  Simon Says Stamp Clean Line Christmas
*Tools:  Gemini Jr


Thursday, November 19, 2020

*Gold Ornament*

In my internet travels, I saw a challenge for a gold and red card... I have no idea where it was but it got the wheels turning.  I used one of the layers from one of the Birch Press layering ornament sets and put it on a red card front.  A little embossing for the greeting and that's about it.

Items Used:
*Cardstock:  Neenah Classic Crest Cover Solar White 110lb; Stampin' Up! Cherry Cobbler; unknown gold
*Images:  Pretty Pink Posh Winter Wreath
*Ink:  Versamark
*Dies:  Birch Press Marisol Ornament (Layer B); MFT Filled With Joy
*Tools:  Gemini Jr; Perfect Layers; heat tool
*Etc:  gold embossing powder


Friday, December 20, 2019

*Another Red Snowflake*

By now, you guys must realize that I don't love wasting perfectly good crafty elements... so of course, when I made that inlaid snowflake card a few weeks ago, I kept the extra snowflake and waited for inspiration to use it. 
The stamping on the glitter paper didn't show up as well as I had hoped, but it's not horrible...

And I have a quick tip for you... things like glitter paper are expensive, but sometimes they make a great layer on a card.  If you can, use dies to cut out the centre of the paper so that you don't waste all that beautiful glitter paper that would be hiding under the layer above it.  I like to use a die 2 sizes smaller than the die I use to cut out the top panel so that I have enough glitter paper to adhere the next layer to.

Items Used:
*Cardstock:  Stampin' Up! Cherry Cobbler; Neenah Solar White 100lb; green glitter paper
*Images:  Hero Arts Off Beat Holiday Messages
*Ink:  Gina K Amalgam
*Dies:  Birch Press Glitz Snowflake
*Tools:  Big Shot; Perfect Layers Tool

Wednesday, December 18, 2019

*Warmest Winter Wishes*

I saw a few cards that looked like this in the past few weeks and decided to try my hand at the technique using my Birch Press snowflake...  I love the look of the inlaid die, but it's a lot of work!  This is not a card you'd mass produce LOL!
Items Used:
*Cardstock:  Neenah Classic Crest Solar White 110lb; Stampin' Up! Cherry Cobbler
*Images:  MFT Giraffes on Ice
*Ink:  Versafine Clair Nocturne
*Dies:  Birch Press Glitz Snowflake
*Tools:  Perfect Layers; Big Shot
*Etc:  Foam tape

Friday, November 29, 2019

*Silent Night Snowflake*

A handful of days ago I shared with you a card that is similar to this one.  When I was making that card, I first cut the largest snowflake out of Stampin' Up! Ballet Blue cardstock but decided it needed to be changed... and I left that Ballet Blue snowflake on my desk.

Here am I using yet another "scrap" from my stamp desk.
Items Used:
*Cardstock:  Neenah Solar White 110 lb; Stampin' Up! Ballet Blue
*Images:  Simon Says Stamp Clean Line Christmas
*Ink:  Stampin' Up! Ballet Blue
*Dies:  Simon Says Stamp Clean Line Christmas; Birch Press Glitz Snowflake
*Tools:  Big Shot
*Embellishments:  clear gems; white gel pen

Monday, November 25, 2019

*Big Snowflake Greetings*

One more month, kids!  One month from today is Christmas Day.  I have no idea where 2019 has gone... I feel like I blinked and here we are at the end of November!  The older I get, the faster it all goes by....
Items Used:
*Cardstock:  Neenah Classic Crest Solar White; Stampin' Up! Glimmer, Bashful Blue, Night of Navy
*Images:  Simon Says Stamp Clean Line Christmas
*Ink:  Versafine Clair Nocturne
*Dies:  Birch Press Glitz Snowflake; Simon Says Stamp Clean Line Christmas
*Embellishments:  clear gems

Friday, June 28, 2019

*Birch Press Bali Take 2*

The card I shared with you on Wednesday left me with the outer ring of the Birch Press Bali dies... and I couldn't just throw those out!  So I created another clean and simple card to share with you.
Once again, I used liquid glue to put together the layers of the die.  I glued this down on the front of a top fold white card, offset to the bottom left of the card, cutting off the parts that hung over the edges of the card.  I die cut the Pretty Pink Posh congrats script die out of the bright green cardstock and went over it with the clear Nuvo Sparkle pen before adding it to the front of the card.

I love that I was able to create two cards out of what I die cut the other day...

Wednesday, June 26, 2019

*Birch Press Bali*

I love these Birch Press mandala dies...  but I struggle to use them.  I struggle to do something a little different with them.  I get bored making cards with a round centre focal element and a sentiment.  While this card is just that, it is a little different...
 I started out by cutting each of the three layers of the Bali die in a different colour of cardstock.  I wanted some bright and cheerful colours so I picked a deep raspberry, bright green and light blue.  I put the layers of the centre mandala together with liquid glue so that I could have some time to play with it before the glue was set up to make sure I got the layers somewhat close to perfect.
I grabbed the A die and put it through my Big Shot with the embossing mat on a white panel to create an embossed image on what would be the front of my card.  Since I was adding more layers to the top of the card, I decided to put together the front of the card first, using my Perfect Layers tool to create a 1/16" border around the front panel and then put it all on to a white top fold card.

I then put the centre design on to the embossed design, trying to get it lined up as best as I could with the design below.  I added the centre circle piece from the raspberry cardstock to the centre of the design.  I then stamped the Lawn Fawn Happy Birthday sentiment from Simply Sentiments in Nocturn VersaFine Clair ink on a piece of the light blue cardstock and cut it down in to a strip.  I layered together the centre flower shapes from each of the three colours of cardstock and added it beside the sentiment, topping it off with an iridescent gem.

I feel like I succeeded in make this very busy die in to a clean and simple card.

Friday, January 25, 2019

*Mandala Celebrate*

I'm not sure how I feel about this card....  I used the Birch Press Stargazer layering dies in black, grey and white and layered it all on to a red circle.  When I look at the card I see "hockey team logo" or something (not a specific one, but that's what I think when I see the card). 

I need to play with this set of dies again...