
Saturday, March 30, 2019
*2019 Christmas Cards #7*
This month at the ABC Christmas Card Challenge was three different letters and three different challenges. This is my entry for G is for Glitz.... I used a snowflake border die cut out of light blue glitter paper, adhered to the front of a white card. I stamped the sentiment from Poppy Stamps in black Catherine Pooler ink using my Misti so I could stamp it over and over again to try to get a darker image.

Friday, March 29, 2019
*2019 Christmas Cards #6*
Another Christmas card for you today... the ABC Christmas Challenge for the letter F was Fabric... and since I don't have any fabric in my craft space, I decided to make myself some plaid to represent fabric.

I purchased this Concord & 9th Plaid Background stamp at the end of the holiday season this past year and never got around to playing with it. I really like how it turned out... I used Black Jack and Rockin' Red inks from Catherine Pooler, a Stampendous die in black and a little silver glitter paper to add a little sparkle.

I purchased this Concord & 9th Plaid Background stamp at the end of the holiday season this past year and never got around to playing with it. I really like how it turned out... I used Black Jack and Rockin' Red inks from Catherine Pooler, a Stampendous die in black and a little silver glitter paper to add a little sparkle.
Wednesday, March 27, 2019
*2019 Christmas Cards #5*
I am back with my ABC Christmas Card Challenge card for the letter E -- Embellishment. Once again I have left it to the end of the month...
 Sadly, you can't really see the embellishments on this card. The small light blue snowflakes are each covered with these adorable clear acrylic snowflakes. I'm not honestly sure how those snowflakes will hold up in the mail so, *note to self*, I need to hand deliver this card come December! LOL!
I used some Catherine Pooler inks and the Christmas Wreath Builder set by Gina K with my Misti. I added the sentiment in the centre and embossed it with silver tinsel embossing powder. I added a thin silver matte before adding it all to a white card.
It wasn't so tough to make Christmas cards when there was a bunch of snow on the ground and the temperatures were well below seasonal average... it was a little tougher on a day that the sun is shining, the snow is mostly melted (except for a few shady spots in the yard) and the temperature is a little above seasonal.
Monday, March 25, 2019
*Happy Birthday*
I have a bunch of patterned paper that I really need to start using more often. It's funny, when I first started card making, I thought that using patterned paper was a form of cheating on my card making skills, so I never used it. Then I started falling in love with the patterns I was seeing so I started using it in my card making. And now I hardly use it again... it's like I've forgotten how.
 This card was quick and easy... I used some Stampin' Up! patterned paper, my perfect layers tools, a stitched rectangle die from MFT, a flower stamp from a Gina K set and a sentiment from Lawn Fawn. Everything was stamped in black Memento ink and the flowers were coloured with Copics.

Saturday, March 23, 2019
*Floral Thanks*
I placed an order with Stampin' Up a few weeks ago and earned some stuff for Sale-A-Bration. I hemmed on hawed on what to order and finally decided on the Delightfully Detailed laser cut paper. This package comes with some sheets of full 12X12 laser cut designs as well as some 12X12 sheets with smaller card sized designs. I decided to cut out some of one of the full cut sheets to see what I could do with it.
 After I had it cut out to a size that would fit on a card front, I needed to make another decision.... what to do with it. The sheets are double sided, one side white and one side Very Vanilla. I took the white side and my blender pen and used some Catherine Pooler inks to colour the different areas of the design. Once I was done colouring, I attached the piece to the front of a white card and then added the Simon Says Stamp "thanks" die cut cut out of black cardstock.
I hope you like it as much as I do!

I hope you like it as much as I do!
Thursday, March 21, 2019
*You'll Owl-Ways Be My Favorite*
Happy Thursday everyone! I am over on the Scrap 'n Stamp blog today with a fun owl card. I decided to mix up a few different elements in to one card to create a fun clean and simple card.
 I had fun playing with the Concord & 9th Bitty Burst Turnabout Stamp as well as some images and dies from My Favorite Things.
 I knew that I wanted my Turnabout Stamp to be in the top left corner of my card instead of centred, so instead of working with a square piece of cardstock or putting the image centred on the cardstock, I played around with how to position things so that it would all work out in the corner. I am thankful that my husband is visual and was able to help me figure this one out! What I learned is that the stamp itself still has to be centred on the Turnabout Jig, but that I can move my cardstock to where I want the image to show up. It's also OK if your cardstock hangs out the edges of your stamping platform, as long as you don't end up pressing too hard on the door near the edges where the cardstock is hanging over the edge. You can see in the photo above you I have the centering guide centred on the jig but my cardstock is not centred.
 I inked up my stamp and stamped it once, then turned my cardstock which is temporarily attached to the jig one quarter turn clockwise. You can see that it just fits inside my Misti on the left side. I cleaned the stamp an inked it again to stamp the second colour.
 Once again, you can see here that my cardstock is hanging out the edge of my Misti...
 I stamped the MFT image with Black Memento Ink and coloured it with the Copics shown above before using the matching die and my Big Shot to cut out the owl. I used foam adhesive to pop up the owl and stamped the phrase using VersaFine Claire ink. I love this ink for fine detailed stamps like phrases and sentiments as it gives such a clean and crisp result.
The more I play with these Turnabout Stamps, the more I am enjoying them. I am enjoying figuring out different ways to use them and am thankful that they came out with the Centering Guides and the Turnabout Jig to help us all get these great stamps lined up perfectly each time!


The more I play with these Turnabout Stamps, the more I am enjoying them. I am enjoying figuring out different ways to use them and am thankful that they came out with the Centering Guides and the Turnabout Jig to help us all get these great stamps lined up perfectly each time!
Tuesday, March 19, 2019
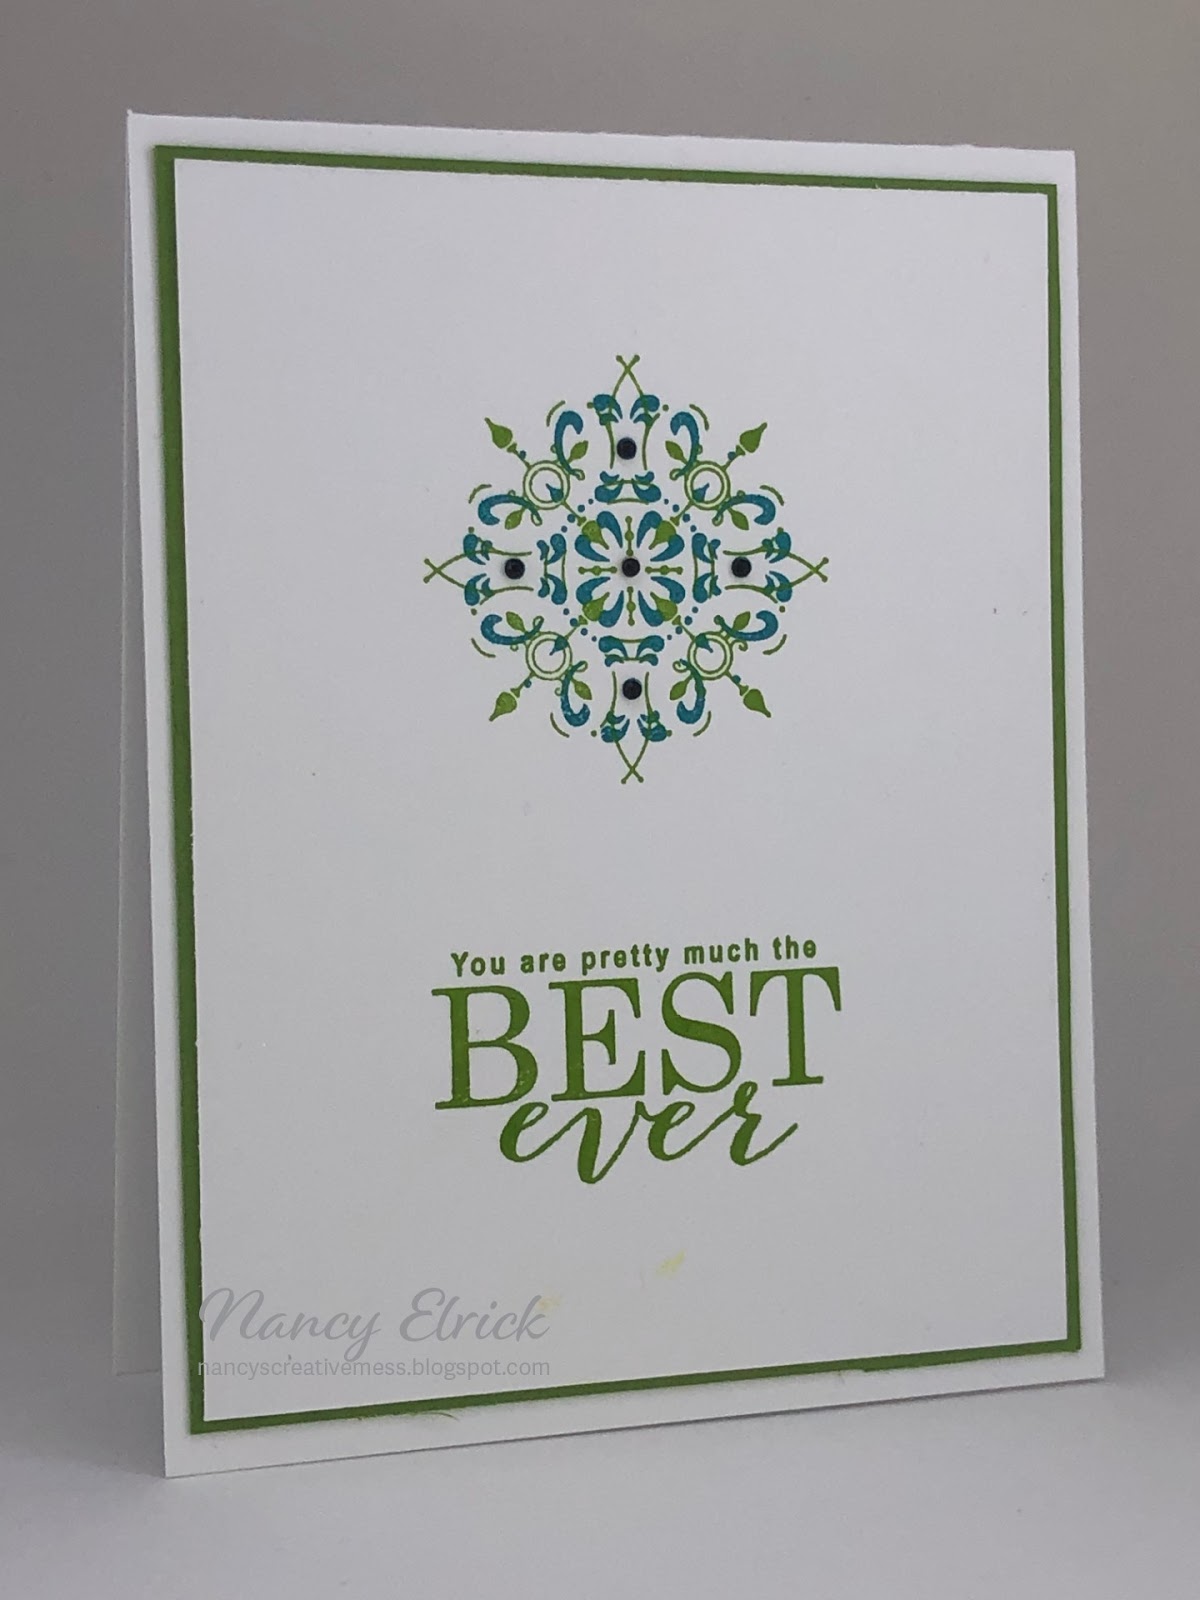
*The Best Ever*
I can't even think of the last time I used anything except a white card base. I love the pop of colour between a front panel and a white card, but every single card seems to be a white card. I guess I like the cleanliness of it... and I like that it's easy to write in when I go to give it to someone.
I got this Sale-A-Bration set from Stampin' Up a few weeks ago and decided to play with it. I used my Stamparatus to get the two different images lined up perfectly to create the medallion. I love this colour combination of Lime Rickey and All That Jazz Catherine Pooler inks.
 I added a few black jewels to the medallion, pulled out my Perfect Layers Tool to create that awesome 1/16" border I love and put it all on to a white card.
For those that have asked, Perfect Layers Tools are no longer being made as Perfect Paper Crafting went out of business. However, We R Memory Keepers sells something that looks (I can't say works as I've not used them) the exact same... they call them Layers Guides... I've seen them at some local stamp and scrap stores as well as on Amazon. They truly are, the best thing ever (see what I did there??!!)
I got this Sale-A-Bration set from Stampin' Up a few weeks ago and decided to play with it. I used my Stamparatus to get the two different images lined up perfectly to create the medallion. I love this colour combination of Lime Rickey and All That Jazz Catherine Pooler inks.
For those that have asked, Perfect Layers Tools are no longer being made as Perfect Paper Crafting went out of business. However, We R Memory Keepers sells something that looks (I can't say works as I've not used them) the exact same... they call them Layers Guides... I've seen them at some local stamp and scrap stores as well as on Amazon. They truly are, the best thing ever (see what I did there??!!)
Sunday, March 17, 2019
*Moonstone Nuvo Paste*
It is finally warmer in Calgary... the sun is shining and we have been above the freezing mark for about a week or so.... and this coming week should only get better!
I ordered some Moonstone Nuvo Drops recently... I had two reasons.... (1) I haven't really played with stencils and texture pastes and (2) I loved the idea that this would add sparkle without blocking the colours I had already used. It arrived the day before a day long crop I went to last week so it was the first thing I pulled out.
 I took a white panel, cut 1/4" smaller on both sides than a full card front and I used my Post It Tape to tape off a strip down the centre of the card on a diagonal. I attached the white panel to the door of my Stamparatus and then positioned the Catherine Pooler stamp under it on the base. I find that when using these large background stamps, it helps to have the stamp on the base instead of the door. I stamped it with black ink and then used my Life Changing Blender Brushes and some Catherine Pooler inks to blend over the stamped image. I set it aside to dry a little but I should have left it longer as the green colour smeared a little in the next step. I used a palette knife and the Nuvo Paste and put a thin layer over the image. Before it dried, I removed the Post It Tape and set it aside to dry again. I added the MFT Cheers die cut out of purple cardstock and layered it all on to a white card.
Not bad for a first try... I have some other ideas in my head but need to find the time and energy to create!
I ordered some Moonstone Nuvo Drops recently... I had two reasons.... (1) I haven't really played with stencils and texture pastes and (2) I loved the idea that this would add sparkle without blocking the colours I had already used. It arrived the day before a day long crop I went to last week so it was the first thing I pulled out.

Not bad for a first try... I have some other ideas in my head but need to find the time and energy to create!
Friday, March 15, 2019
*Happy Wishes*
I decided to create a card with a floral focus on it so I grabbed some stamps from my Gina K Wreath Builder set and some Catherine Pooler inks (in Flirty Fuschia, Tiki Torch, Grass Skirt, Party Dress and Twilight). I used Post It Tape along the card to create a crisp (and straight) area for the stampin. I stamped the two grey circles first and then just layered leaves and flowers on the card. The lighter green images are simply second generation stampings of the Grass Skirt ink.

I added the Lawn Fawn words with Black Jack Catherine Pooler ink. This card is not only clean and simple, but it is one layer (just the folded card).

I added the Lawn Fawn words with Black Jack Catherine Pooler ink. This card is not only clean and simple, but it is one layer (just the folded card).
Wednesday, March 13, 2019
*Happy Birthday*
I had big plans for this card. In my head, it was truly stunning. I am sharing it with you today even though I wanted to throw it out. I'm sharing it to show you that while it's not exactly what I had in my head that this very simple card isn't garbage. It can still be used. Someone will still love it.

I started out using my Life Changing Blender Brushes and some Catherine Pooler inks on white cardstock. I blended shades of blue and teal to create not only the background layer but also the piece I die cut for the front. I wonder now if I should have left off the "birthday" part of the and just stamped the word on the card. Hmmmmm
I layered everything together with my Perfect Layers Tool and then added some clear bling to finish it off.
Not my best work, but it's not horrible either.
Monday, March 11, 2019
*Sweet Baby*
Happy Monday all... so happy to report that Calgary is finally seeing some warmer weather again. After more than a month with our temperatures all well below freezing, our forecast now only shows temperatures above 0C for the next several days. I sure hope we don't go back to the deep freeze we've been in!
I was asked by friends we bowl with to create a baby shower invitation for the one person they are inviting who isn't on FB. They know they are having a girl so I decided to play with pinks and purples. I also knew I didn't want to go with traditional baby images so I reached for my Gerda Steiner unicorn to create this card.

I used some silver iridescent foil on a polka dot foiling sheet to get those wonderful polka dots. I coloured the image with my Copics but didn't worry at all about blending. I attached the unicorn to a white rectangle with pop dots and then added the chain circle from MFT) for a little interest. The sentiment is from an old PTI set I had laying around and I stamped it with Twilight Catherine Pooler ink. I added the purple layer using my Perfect Layers tool and then added it all to a white card. I added the information about the shower to the inside using my printer and a fun font.
Friday, March 08, 2019
*This Pun's For You Blog Hop*
Happy Friday Everyone! The Scrap 'n Stamp Design Team is back hopping today and we hope you'll play along! Follow along on each of the stops listed below and leave a comment on each blog for your chance to win! There will be one grand prize winner chosen from all of the comments as well as a winner for each stop on the Hop! And of course you can check out the Scrap 'n Stamp Challenge Page on Facebook to show us your creations as well!
 For March, our theme is This Pun's For You! I had been eying this stamp set from My Favorite Things for a while and was thrilled to have a good excuse to purchase it!

 I started off with a piece of white cardstock cut to 4" X 5.25", just slightly smaller than an actual card. I used some low tack tape to keep my Lawn Fawn stitched circle die and the MFT Linked Chain Circle Frame die in place so I could put it through my Big Shot. I was careful to use a clean, unmarked plate next to the front of my card to avoid transferring any debris or previous cuts in to the front of my card.
 I flipped the card over and taped the circle back in to the card as an inlay using some regular tape. I then used some Lawn Fawn glue to attach a piece of acetate to the back of the panel.
 I turned the panel back over so that the front was facing me. I cut out a second chain circle die in dark green cardstock and then I used more Lawn Fawn glue in little teeny dots on the back of the chain circle die and inlaid it on top of the acetate (I buy overhead projector sheets for laser printers at Staples). I added the interiors from the white chain circle with more glue. My little tweezers helped me a lot with those little pieces!
 I took my roll of double sided foam adhesive and folded it in half along itself to create the raised circle around the window cut out. By having it doubled I have more room for the stuff in the shaker and by folding it in half to make it skinny the tape is easier to work around the circle shape. I added more pieces of doubled up double sided foam tape around the back of the card so that it was all well supported on the card. What you don't see is that this is where I added some clear hole-less beads and sequins from my stash to the interior of the circle. I added a little glue to the double sided tape to allow me a little more "move" time to get my card attached to this front since I was doing it blind... the glue allowed some play time. I also lined up the card front on my grid paper and stood up so I was looking directly down on it to place my card.
 I stamped the great TRex image from the MFT You're Rawr-some stamp set with Tuxedo Black Memento ink and coloured it with two colour blending using my YG17 and YG23 Copics. I used the die set and my Big Shot to cut it all out. I stamped the sentiment in black Versafine Ink and cut it out to create the flag edge and taped it to the front of the card before laying the dinosaur over top of it. To finish off the card I added some Nuvo Aqua Shimmer Pen to the dinosaur and some bling from my stash to the front of the card.

Please leave a comment here and then follow along with the rest of the design team to see all the wonderfully punny creations!
Tara
Meghan -- Guest Designer!
Nancy F
Susan
Deborah
Kia
Nancy E -- you are here!
Dawn
Chala
Laurie


I wanted to show you all that you can make a more elaborate card but still make it Clean and Simple. So I put together this shaker card for you. It will be an awesome interactive card for someone!


Please leave a comment here and then follow along with the rest of the design team to see all the wonderfully punny creations!
Tara
Meghan -- Guest Designer!
Nancy F
Susan
Deborah
Kia
Nancy E -- you are here!
Dawn
Chala
Laurie
Wednesday, March 06, 2019
*Simple Smile*
Happy Wednesday everyone... today is the last forecasted cold day here in Calgary.... we should be heading towards temperatures above the freezing mark over the next few days and I really really hope that we don't find ourselves back in this frigid cold again. I am so tired of having to bundle up to go out!
I need to pack for a crop this weekend... spending Saturday with my friends Bonnie and Deanna making cards, eating junk and laughing. I hope I can get some stuff created as my stash for sharing on my blog is pretty small right now!
This is a very clean and simple card that I created the other day and I love how it turned out...

I simply used an embossing folder on a piece of white cardstock that was cut a 1/4" smaller than my card. I added the Smile die cut out of black cardstock and then used white embossing powder over Versamark ink on black cardstock and popped up the rest of the sentiment. I added some bottlecap sequins and put the front on to a white card and called it done.
*I Interrupt The Regularly Scheduled Programming....*
Hey All... just a quick interruption in card posts... I will be posting this a few times over the next few months.
As many of you know, I was diagnosed with Colon Cancer in May 2017. I was lucky that it was found and lucky that we caught it at late stage II. I had surgery to remove more than half of my colon on June 23 2017 and in August 2017 I started oral chemo.... 2 weeks of pills with a week off in between. I ended up reacting pretty roughly to the chemo and not only did we have to spread out my chemo rounds a little more, I also had to take a leave of absence from work.
It was during that leave of absence that my friend Bonnie and I started hanging out more and I started crafting more. I have been card making since 1996 but once I started working full time 7 years ago, my crafty time decreased dramatically, as did my desire to create.
I am thankful that this awful disease led me back to creating ... and I so happy to be making again!
This is all here to give you a background as to why I'm asking for donations. Last year, on the anniversary of my surgery, I walked with family and friends in the 5k Push For Your Tush in Calgary. Now, I walk every single day so a 5k isn't a big deal for me... but the fundraising for Colon Cancer Cancer is a big deal. This organization helps patients and families diagnosed with Colon Cancer as well as funds research in to Colon Cancer.
If you can, I'd love it if you could click HERE to donate.
Sunday, March 03, 2019
*You Make Me Happy*
I am back on the Scrap 'n Stamp blog today with a card I created this past week. I had a tough creative week this past week... I spent a lot of time at my desk just shuffling things around. I *wanted* to create but honestly, nothing was talking to me... nothing was getting me excited. Finally, a few hours before I head to work on Wednesday (my work week starts around noon on Wednesdays), I had an idea in my head that took a while to come to fruition but I am thrilled with the card I ended up with.
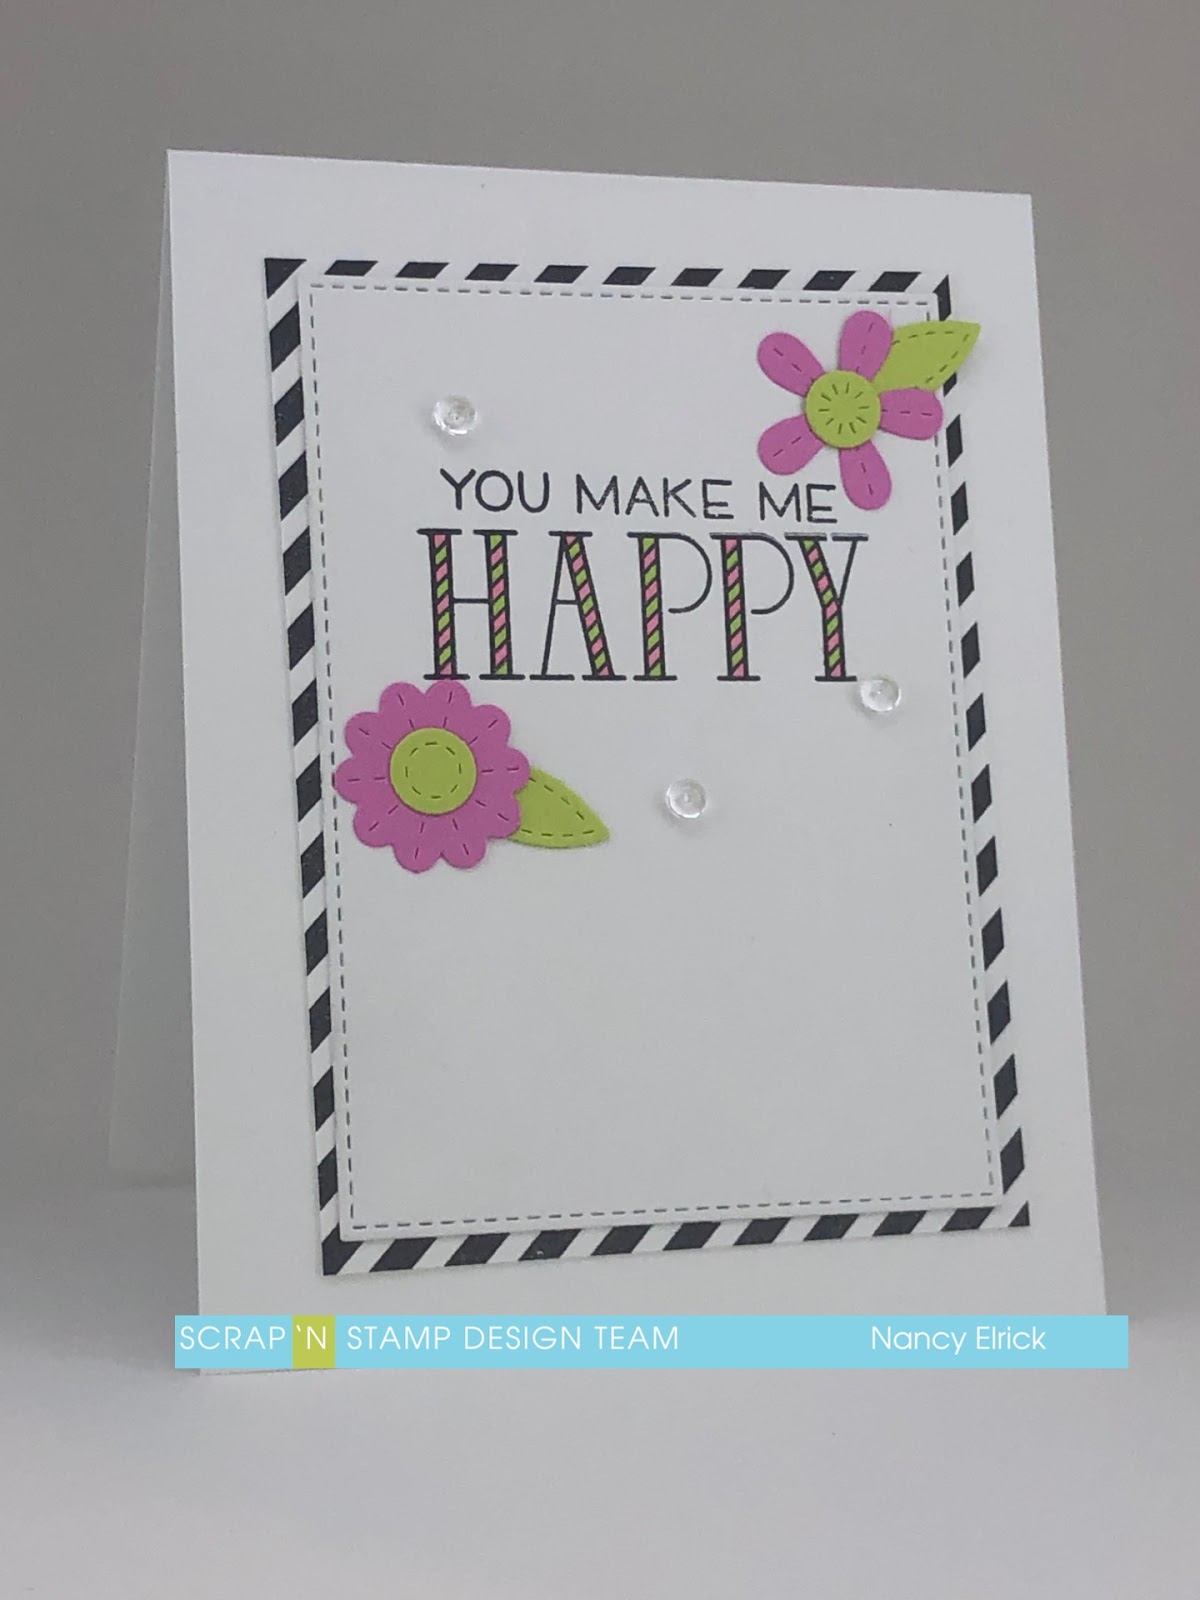
For this card, I used stamps from Lawn Fawn, a rectangle die and floral dies by My Favorite Things, my copic markers and black Memento Ink. I added a few clear gems for a little texture and voila! I love how the black and white background creates such a crisp focal point for the card.
Friday, March 01, 2019
*Happy Birthday*
How on earth is it March already??!! Didn't we just start 2019?? The older I get, the faster it all goes!
I had a vision in my head but I'm not sure that this card totally did what I wanted it to. I used the HAPPY stamp from the Lawn Fawn Happy Happy Happy set and stamped it in Lime Rickey and All That Jazz inks from Catherine Pooler. I used my Stampin' Up! Stamparatus to do the repeat stamping thanks to the "door" that can be taken off and repositioned. I added the birthday stamp from the Avery Elle Big Birthday stamp set stamped in Catherine Pooler Blackjack ink. I added a teal layer with my Perfect Layers tool and added it all to the white card base.
 It's not like it's a bad card... but it's just not exactly what was in my head... and I don't know how to make it what I saw in my head.
Thanks for popping by and for leaving some comments! I always enjoy the feedback!
I had a vision in my head but I'm not sure that this card totally did what I wanted it to. I used the HAPPY stamp from the Lawn Fawn Happy Happy Happy set and stamped it in Lime Rickey and All That Jazz inks from Catherine Pooler. I used my Stampin' Up! Stamparatus to do the repeat stamping thanks to the "door" that can be taken off and repositioned. I added the birthday stamp from the Avery Elle Big Birthday stamp set stamped in Catherine Pooler Blackjack ink. I added a teal layer with my Perfect Layers tool and added it all to the white card base.

Thanks for popping by and for leaving some comments! I always enjoy the feedback!
Subscribe to:
Comments (Atom)