Welcome to another edition of The Scraps on Nancy's Desk... if you've been here for a while you've seen me using scraps I've found on my desk to put together a new card. I don't keep every scrap and piece, but I keep some things... especially this paper from a really old stack from Michaels. I love love love this red and silver glitter striped paper and I don't want to waste any of it. This small square was left after creating the frame on the snowman card from Nov 10th. I knew I didn't want to throw it out but I didn't know what I should do with it. Thanks to my friend Bonnie who suggested I made it in to a present...
Items Used:
*Paper: glitter paper from an old Michael's stack; red mirror cardstock
*Images: Poppy Stamps Art Deco Celebrate Christmas
*Ink: Versafine Clair Nocturne
*Die: My Favorite Things Filled With Joy
*Tools: Perfect Layers Tool
I really really love snowflakes and snowmen.... but I hate snow. I live in a part of the world where we see snow from fall until spring but I am thankful we get some warmer weather in there as well. I think snowflakes are beautiful and snowmen are adorable... and while the snow makes everything look clean and bright, I still don't like it. I'd love to live in a world where we have snow over Christmas and that's it!
I love the snowflake border I used on this card... it just feels perfect to me...
Items Used:
*Paper: Stampin' Up! Feels Like Frost
*Dies: Memory Box Frostyville Border
*Tools: Big Shot
*Stamps: Stampin' Up! Snow Is Glistening
*Ink: Catherine Pooler Stone Blue
I think I'm at the point where I need to start posting pretty much daily so that I'm not still showing you Christmas cards in January... although honestly, it might still happen! I am about 1/3 of the way done my Christmas cards for 2019... I have some major work to do to get them all done! I sat in my craft room yesterday and made 4 cards in more hours than I'd like to admit... but 4 cards is better than the no cards I made the day before LOL!
This card idea came from a card I saw on Pinterest. Check out the card that snagged my eye HERE. I love this plaid paper from Stampin' Up! and while I thought it was a little too busy at first, I think I like it....
Items Used:
*Cardstock: Stampin' Up! Shaded Spruce
*Paper: Stampin' Up! Wrapped in Plaid
*Tools: Stampin' Up! Tree Punch; Perfect Layers Tool
*Embellishments: Stampin' Up! Gold Star
Welcome to challenge number 153 with AAA Cards! For the next two weeks, we are challenging you to play along with us to create a clean and simple card. The challenge for #153 is one image and the optional challenge is shimmer. By linking up your creation, you have the change of winning a $15 gift certificate to Funky Fossil Designs!
For my card, I once again played with a scrap that was on my desk. If you'll recall, a few days ago I posted a similar card and said I wasn't completely happy with it. I still had a square of that wonderful patterned paper on my desk so I decided to try again. This time instead of creating a layer behind my image, I used this great glitter paper to form a frame.
I really like this card a lot more than the last one.
Items Used:
*Cardstock: Stampin' Up! Cherry Cobbler; white from my stash
*Paper: glitter paper from Michaels (from many years ago)
*Images: Mama Elephant Little Snowmen Agenda
*Ink: Gina K Amalgam; Copics
*Tools: Memory Box Square Basics dies; Big Shot
*Embellishments: Lawn Fawn Glitter Pen
The LPN at our Drs is truly fabulous... she is kind, caring, funny, helpful.... I look at her like she's my little sister or something (by a lot of years... maybe my daughter). She got engaged earlier this year and is getting married next week... I wanted to give her a little gift so of course I had to make a card to go along with it...
I have no idea what her bridal colours are (or if she's even doing that) so I wanted something neutral and clean.... so hello white on grey.
Items Used: *Cardstock: Stampin' Up! Basic Grey, Shimmer
*Dies: Pretty Pink Posh Congrats; My Favorite Things Stitched Blooms
For this card I arranged the flowers on the grey card how I wanted them and then picked it all up with some Press 'n Seal (yup, from the kitchen), flipped it over, applied some adhesive and placed it all on to my card front.
I absolutely fell in love with this patterned paper from Stampin' Up! Each page is double sided... one side is a great snowy or frosty photograph and the other side is is a foiled design. It's a 6x6 pad so the designs are shrunk down to fit on cards well. I didn't know if I'd really be able to do anything with the frosty scenes since I tend towards clean and simple cards more than anything... but I saw an idea and decided to run with it. And honestly, I love how it turned out!
Items Used:
*Cardstock: White; dark blue shimmer; Stampin' Up! Basic Black
*Paper: Stampin Up! Frosted Foliage
*Images: Kraftin' Kimmie Christmas Cheer Sentiments
*Ink: Versafine Clair Nocturne
*Tools: Perfect Layers Tool
Welcome to another challenge with CASology! For challenge #353, we are looking to see your clean and simple cards of appreciation!
This cue came at the perfect time for me... I wanted to send a special friend a card of thanks at the end of October... a card for someone who has stepped up to be a great friend to me, keeping my spirits up, helping me process information, letting me cry when I needed it. I am truly blessed to have a couple of amazingly awesome friends in my circle....
I love the look of this black and white with a pop of colour card... Lots of white/unused space on this card and the stark black words seem to make the sentiment that much more important.
A quick and easy card for you all today... I stamped up some holly leaves from a Catherine Pooler set and cut them out with my Brother Scan 'n Cut. I suppose I could have just stamped them on the white panel, but by stamping and cutting them out I had the ability to play with their placement. this card could easily be replicated to do multiples of them... especially by using the Scan 'n Cut to cut out the holly leaves.
Items Used
*Cardstock: White; Stampin' Up! Basic Black
*Images: Catherine Pooler Tis The Season; Stampin' Up! Beautiful Baubles
*Ink: Versamark; Catherine Pooler Grass Skirt
*Tools: Brother Scan 'n Cut; Perfect Layers; My Sweet Petunia Cut Align
*Embellishments: Candy Cane Stickles; white embossing powder
Welcome to November!!! I am in full Christmas Card Making Mode now.... with the odd non-Christmas card still to make it in to the mix. I absolutely love making Christmas cards. The largest part of my crafting collection is Christmas themed... and I'm not at all ashamed by that LOL!
I love cards like this that come to be by using a scrap (or scraps) that are on my desk. Last year, when I purchased the Concord & 9th Plaid Background stamp, I played around with a few black and red colour combinations. I used two of them last year and had one left. Instead of throwing it out, I kept it in a bin on my desk... and I pulled it out while playing the other day and decided to see what I could do with it.
Items Used:
*Cardstock: White; Stampin' Up! Basic Black and Cherry Cobbler
*Images: Catherine Pooler Tis the Season; Concord & 9th Plaid Background
*Ink: Catherine Pooler Grass Skirt, Blackjack, Rockin' Red
*Dies: MFT Filled With Joy
*Tools: Perfecta Layers Tool; Brother Scan 'n Cut; Big Shot
*Embellishments: red pearls
October sure did get away from me.... I don't think I really sat down to create until about the 20th of the month... and thankfully I had energy, mojo and time all at once!
Once again I was inspired by a card I saw on Instagram.... and I believe it's important to give credit when I can! Check out Christine's Instagram for some great cards!
I like Christine's original card better than this one.... not that this card is awful, but it's not quite right. Sometimes that is the problem with using another card for inspiration... nothing is just right, making the card feel off.
I absolutely LOVE this glitter striped paper from a pack I bought at Michael's many years ago (in fact, I think I bought 4 packs).... I will be so sad when I have used the last of the paper. Sure wish I could get more.
Happy Sunday Everyone! It's time for another challenge over at the AAA Cards blog. For Challenge #152, we are playing with cards with "maxi white space" and the optional twist is "geometric"
Our guest designer for this challenge is Emily... go on over and have a look at her blog and her wonderful creations! And once again, our sponsor this challenge is Uniko! Be sure to check out what the design team has been up to and also link your card so you too can be eligible to be a guest designer for an upcoming challenge! Remember that these challenges are for clean and simple cards which means a lot of empty unused space... and for this challenge we want you to stretch yourself on how much white space (blank space) you can leave on the card!
I had an idea in my head for the geometric twist and I am SO happy it turned out...
I started out with four different sized squares cut out of green cardstock. I used a metal ruler and my craft knife to cut those squares in half, creating triangles. I lined up the largest triangle on my grid paper and glued the next size smaller to the top of it... I did this with all four pieces to create each tree. I cut out tree trunks from a scrap of brown cardstock (just with scissors) as well. For the stars I cut a scrap of glitter paper using my Silhouette. The bottom tree is adhered right to the front of the card and the top tree is adhered using foam tape. The hardest part of this card was deciding where to put the sentiment... and I'm still not sure I made the right decision. It would have been easier had I put the trees in the centre of the card.
Items Used:
*Cardstock: white; Stampin' Up Gumball Green; scrap of brown; scrap of gold glitter
*Images: Lawn Fawn Simply Winter Sentiments
*Ink: Catherine Pooler Icing on the Cake
*Tools: Big Shot; Silhouette
*Dies: Memory Box Square Basics
This card is inspired by a card I saw on Instagram by Simply Graphic. I changed things up a little but followed the original design pretty closely because honestly, I loved everything about the card... the layout and the colours really caught my eye!
The month of October has been mostly a write-off for me craft-wise. There hasn't been a lot of creative time and where there has been time there has been no mojo or difficulty getting in to my craft space. I hate it when real life gets in the way of my creativity!
One of the ways it was a write-off, is that I didn't manage to get some of my October birthday cards off in a timely manner. In fact, I only mailed this card this morning for a birthday at the beginning of the month. Ooopps!
This card went together pretty quickly once I was able to find some time. I took one of the smaller pieces from the Stampin' Up! laser cut paper and trimmed it down to size. I sprayed the back of it with spray adhesive and put it on to a piece of pink cardstock before layering it on to a white card. I added the embossed sentiment and a few black gems to finish it off.
Items Used: *Cardstock: white; Stampin' Up! Melon Mambo, Basic Black
*Paper: Stampin' Up! laser cut paper
*Images: MFT Bitty Birthday Wishes
*Ink: Versamark
*Tools: Heat tool
*Embellishments: black pearls
*Etc: white embossing powder
Welcome to another challenge on the CASology Blog! This challenge is to use FOG as your inspiration. A big thank you to our sponsor for this challenge... STAMPlorations!
I don't think I've ever made a Halloween card before.... and here I have made two in the last week LOL! I had a tough time with this cue, and while I'm not thrilled with my creation, I think it turned out OK.
I started this card by taking a piece of black cardstock and lightly blending white pigment ink along the sides to create my "fog". I left the very middle without ink. I then mixed some Lawn Fawn Liquid Stardust with water and picked it up with a paint brush and flicked it on the card to create a more eerie effect.
I stamped the ghost from the Essentials by Ellen Got Candy stamp set on white cardstock with Nocturne VersaFine Clair ink and cut it out with the matching die. I also cut out the ghost shape from the black cardstock. I attached black panel to the front of the white card with foam tape and then glued the ghost to the front of the white card ... the ghost is inset and a layer lower than the black cardstock.
To finish off the card I stamped the word "boo" in the bottom corner of the black panel with the Nocturne ink.
Items Used: *Cardstock: white from my stash; Stampin' Up! Basic Black
*Images: Essentials by Ellen Got Candy
*Ink: Stampin' Up! Whisper White craft ink; Versafine Clair Nocturne
*Dies: Essentials by Ellen Got Candy
*Tools: Big Shot;
*Embellishments: Lawn Fawn Liquid Stardust
*Etc: foam tape
Please head over to the CASology blog to see how the rest of the design team interpreted the FOG cue. Also be sure to link your foggy creation for your chance to be a guest designed on a future challenge!
Hello Everyone! Welcome to another Challenge with the AAA Cards team!! This challenge is a one corner card with the optional twist of using the posted colour palette. Our sponsor for this challenge is STAMPlorations and our Guest Designer is Sandie!
I saw these colours and immediate thought "Halloween", which is strange because I don't do Halloween cards! You need to use at least two of the colours from the photo in your card and I love that each member of the design team interpreted it differently!
I stamped the pumpkins from the Essentials by Ellen Got Candy stamp set with Gina K Amalgam ink and coloured them with my Copic markers. I cut them out with the matching dies and glued to them to the front of a top fold card. I stamped a few of the stars with Catherine Pooler inks and stamped and embossed the sentiment on black cardstock with VersaMark ink and white embossing powder. I cut it out with the Lawn Fawn Everyday Sentiments Banners die and adhered it to the front of the card. I then stamped the spider with Nocturne VersaFine Clair ink and cut it out, then attached it to the card with small foam dots.
Items Used:
*Cardstock: white from my stash; Stampin' Up! Basic Black
*Images: Essentials by Ellen Got Candy
*Inks: Versafine Claire Nocturne; Gina K Amalgam; VersaMark; Catherine Pooler Real Red and Limoncello; Copic Markers
*Dies: Essentials by Ellen Got Candy; Lawn Fawn Everyday Sentiments Banners
*Tools: Heat Tool; Big Shot
*Etc: foam dots; white embossing powder
Be sure to head over to the AAA Cards Blog to see what the rest of the design team has created ... and link your creation for your chance to become a Guest Designer on an upcoming challenge!
When my friend asked me to make a card to congratulate a family on their new home, I really wanted to use an image of a house or houses in a row... but the only stamp I had was so obviously Christmas/Winter that I could do it!
So instead I decided to play with my Foil Quill pen and my Silhouette!
I found a clip art image on the internet and used the trace tool in the Silhouette software and then foiled it in gold on white cardstock. I cut it out with the MFT Stitched Rectangles and created a black mat with my Perfect Layers tool. I put it all on to a white card and then used the Lawn Fawn Everyday Sentiment Banner to cut out the white embossed Lawn Fawn sentiment and adhered it to the front of the card with foam tape.
It's awfully simple, but I am pleased with it! I hope my friend is too!
Happy Wednesday, everyone!!! I hope you are all having a good week so far. Calgary got another dump of snow yesterday (we had a huge snowstorm about 10 days ago and all of that snow had melted) so I am looking out my window at a whole lot of white. The nice thing about Calgary is that even though we get snow (sometimes way too early), we can almost count on the sun to come out again and melt what's on the ground.
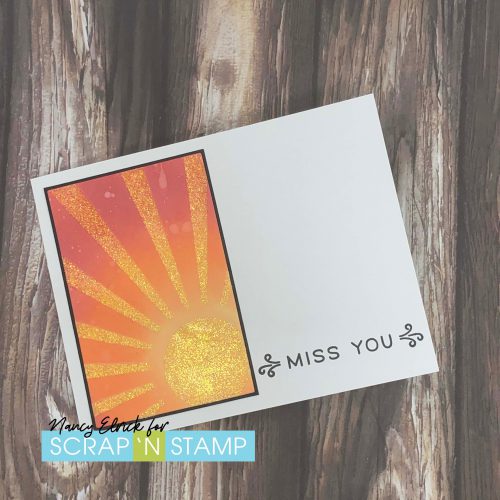
In trying to figure out what to share on the blog today, I was feeling a little stumped. I just didn't know what I wanted to do. I was in a bit of a creative slump. I was sitting at my desk for quite a while before I decided to grab one of my cast off ideas from the Distress Ink Blog Hop last weekend and create with that. While I didn't love how this piece turned out a week ago, I decided to see what I could come up with. I created this piece as a full 4.25 X 5.5" panel and it was just too much for my liking... thus why I didn't use it for the blog hop. For this card, I trimmed it down quite a bit to fill only a portion of the card.
I started by inking a white piece of cardstock with three colours of Distress Oxide ink (Dried Marigold, Ripe Persimmon, Fired Brick). I set the panel aside to dry for a while before placing the Picket Fence Studios Sunburst stencil over top of the piece and smearing on some Moonstone Nuvo Glimmer Paste. I once again set it aside to dry. I like how the glimmer paste changes the colours of the background.
To create the card I simply matted the trimmed down sunburst panel with black cardstock and placed on the side of card. I stamped the sentiment from Lawn Fawn Simply Sentiments in Nocturne VersaFine Clair ink.
A super simple card, but I find that the oxide blended background and the glimmer paste really give it a pop!
Another of the thank you cards that my friend asked me to make for her....
I started out blending Catherine Pooler inks on white cardstock and setting it aside to dry for a bit before cutting out the word "thanks". I love this black and white striped paper from MFT to add a little interest to cards. I stamped and embossed the rest of the sentiment from a Stampendous set on black cardstock with white embossing powder. I set it all off with a purple layer using my Perfect Layers Tool.
Items Used:
*Cardstock: from my stash
*Images: Stampendous Big Words Thanks
*Ink: Versamark; Catherine Pooler Rockin' Red, Orange Twist, Tiara, Lime Rickey, Something Borrowed, Flirty Fuschia *Dies: Simon Says Stamp Big Thanks
*Paper: My Favorite Things Black & White Stripes
*Tools: Picket Fence Studios Life Changing Blender Brushes; heat tool; Perfect Layers Tool; Big Shot
*Etc: White embossing powder; Lawn Fawn Glitter Pen
A month or so ago my friend Bonnie and I purchased a grab bag envelope of stamps and dies from Ardyth when she was clearing out some of her stash. Bonnie and I sat down over lunch one day and split the contents of the envelope... and I was thrilled to get this Simon Says Stamp Circle of Leaves die!
I love how clean and simple this card turned out with a little bling and a pop of colour with the die cut sentiment! I put the top panel on to the front of the card using foam tape.
Items Used: *Cardstock: unknown as the green was a scrap
*Dies: Simon Says Stamp Big Thanks; Simon Says Stamp Circle of Leaves
*Etc: assorted bling; foam tape
I know that the big thing about the distress inks is that they react with water... but since that was what I figured everyone else would be doing, I decided to try to figure out another way to use them. Let me tell you, there were a LOT of attempts before I found something I liked!
I was asked by a friend to make a set of cards for her... three thank you cards and a congratulations on your new home card... so I killed two birds with one stone with this card LOL!
I started out by using the Picket Fence Studio Sunburst Stencil on some white cardstock using the Nuvo Glimmer Paste in Moonstone. I set it aside to dry for several hours while I worked on some of the other cards my friend asked me to make. I wanted to make sure it was good and dry before I did the next step. I just LOVE this Glimmer Paste!
I repositioned the stencil on my card and grabbed my Distress Oxide inks in three shades of orange and red and coloured over the Glimmer Paste with the Tim Holtz Blending Tools. I went over it all once, set it aside to dry and then went over it all again. I find the the Distress Oxide inks dry lighter in colour than they look when they are fresh.
I trimmed down the stencilled panel after the inks were dry and created a 1/16" black mat around it. I then adhered it to the front of a side fold card.
And then it went through several changes over the next few days while I figured out how to finish it off. I stamped the Lawn Fawn sentiment in VersaFine Clair Nocturne ink and cut it out with the banner die. I had the little scrap of MFT paper sitting on my desk from a previous project and added it behind the sentiment for a little "something-something".
I hope you'll HOP along with the rest of the Design Team.... and be sure to leave comments at all of the stops along the way! We will be choosing one person to win a $50 gift certificate from Scrap'n Stamp!! WAIT, there's more!!! Order from today until midnight on October 6th and get 10% off all things OXIDE (yes, even the *new* sprays!) with the coupon code OXIDE10 (not valid with any other coupon, sale or promotion. Valid on in stock items only)